By: Team W17-4 Since: Sep 2018 Licence: MIT
The Deadline Manager is an app to help users keep track of upcoming deadlines. It is targeted for students in NUS School of Computing, and has features dedicated to improve their workflow. This Developer Guide help you get started with contributing to this open source project.
- 1. Introduction
- 2. Setting up
- 3. Design
- 4. Implementation
- 5. Documentation
- 6. Testing
- 7. Dev Ops
- Appendix A: Suggested programming tasks to get started
- Appendix B: Product scope
- Appendix C: User stories
- Appendix D: Use cases
- Appendix E: Non-functional requirements
- Appendix F: Glossary
- Appendix G: Product survey
- Appendix H: Instructions for manual testing
1. Introduction
This guide is written with the intention of providing relevant and useful information for new developers to quickly familiarise themselves with the structure of the project.
If you already have some experience developing this project, this guide should serve as a handy reference for specific implementations of features.
1.1. Structure of this Developer Guide
In Section 2, this guide will first provide instructions on setting up your programming environment.
1.2. Development team
This project is developed by Team W17-4 based on the original SE-EDU AddressBook Project. For more information, please refer to our About Us guide.
2. Setting up
This section of the developer guide will help you set up your programming environment to begin contributing to this project.
2.1. Prerequisites
The following software is required for building Deadline Manager.
-
JDK
9or laterJDK 10on Windows will fail to run tests in headless mode due to a JavaFX bug. Windows developers are highly recommended to use JDK9. -
IntelliJ IDE
IntelliJ by default has Gradle and JavaFx plugins installed.
Do not disable them. If you have disabled them, go toFile>Settings>Pluginsto re-enable them.
2.2. Setting up the project on your computer
-
Fork this repo, and clone the fork to your computer
-
Open IntelliJ (if you are not in the welcome screen, click
File>Close Projectto close the existing project dialog first) -
Set up the correct JDK version for Gradle
-
Click
Configure>Project Defaults>Project Structure -
Click
New…and find the directory of the JDK
-
-
Click
Import Project -
Locate the
build.gradlefile and select it. ClickOK -
Click
Open as Project -
Click
OKto accept the default settings -
Open a console and run the command
gradlew processResources(Mac/Linux:./gradlew processResources). It should finish with theBUILD SUCCESSFULmessage.
This will generate all resources required by the application and tests. -
Open
XmlAdaptedTask.javaandMainWindow.javaand check for any code errors-
Due to an ongoing issue with some of the newer versions of IntelliJ, code errors may be detected even if the project can be built and run successfully
-
To resolve this, place your cursor over any of the code section highlighted in red. Press ALT+ENTER, and select
Add '--add-modules=…' to module compiler optionsfor each error
-
-
Repeat this for the test folder as well (e.g. check
XmlUtilTest.javaandHelpWindowTest.javafor code errors, and if so, resolve it the same way)
2.3. Building and running the project
-
Press the green
buildbutton on the top right corner ofIntelliJto build the project. -
Press F10, then select
MainAppto run the project.After you build for the first time, subsequently, the project can be run by pressing the green playbutton instead.
2.4. Verifying the setup
To test that you have correctly imported the project,
-
Run the
seedu.address.MainAppand ensure that the program launches successfully. -
Run some sample commands and check that they do not cause any errors:
-
help -
list
-
-
Run the tests to ensure that they all pass.
2.5. Configurations to do before writing code
Before you start contributing to this project, ensure that you have configured your IntelliJ as follows to conform with our coding standards and project structure.
2.5.1. Configuring the coding style
This project follows oss-generic coding standards. IntelliJ’s default style is mostly compliant with ours but it uses a different import order from ours. To rectify,
-
Go to
File>Settings…(Windows/Linux), orIntelliJ IDEA>Preferences…(macOS) -
Select
Editor>Code Style>Java -
Click on the
Importstab to set the order-
For
Class count to use import with '*'andNames count to use static import with '*': Set to999to prevent IntelliJ from contracting the import statements -
For
Import Layout: The order isimport static all other imports,import java.*,import javax.*,import org.*,import com.*,import all other imports. Add a<blank line>between eachimport
-
Optionally, you can follow the UsingCheckstyle.adoc document to configure Intellij to check style-compliance as you write code.
2.5.2. Updating documentation to match your fork
After forking the repo, the documentation will still have the W17-4 team branding and refer to the CS2103-AY1819S1-W17-4/deadlineManager repo.
If you plan to develop this fork as a separate product (i.e. instead of contributing to CS2103-AY1819S1-W17-4/deadlineManager), you should do the following:
-
Configure the site-wide documentation settings in
build.gradle, such as thesite-name, to suit your own project. -
Replace the URL in the attribute
repoURLinDeveloperGuide.adocandUserGuide.adocwith the URL of your fork.
2.5.3. Setting up CI
Set up Travis to perform Continuous Integration (CI) for your fork. See UsingTravis.adoc to learn how to set it up.
After setting up Travis, you can optionally set up coverage reporting for your team fork (see UsingCoveralls.adoc).
| Coverage reporting could be useful for a team repository that hosts the final version but it is not that useful for your personal fork. |
Optionally, you can set up AppVeyor as a second CI (see UsingAppVeyor.adoc).
| Having both Travis and AppVeyor ensures your App works on both Unix-based platforms and Windows-based platforms (Travis is Unix-based and AppVeyor is Windows-based) |
2.5.4. Getting started with coding
When you are ready to start coding,
-
Get some sense of the overall design by reading Section 3.1, “Architecture”.
-
Take a look at Appendix A, Suggested programming tasks to get started.
3. Design
This section aims to provide an overview of the structure behind Deadline Manager. For detailed implementation details on specific features, please refer to Section 4 instead.
3.1. Architecture
This section (3.1) will give a brief overview on the components in Deadline Manager, as well as overview of design principles of the Deadline Manager. Sections 3.2 through 3.7 below will give more details of each component.
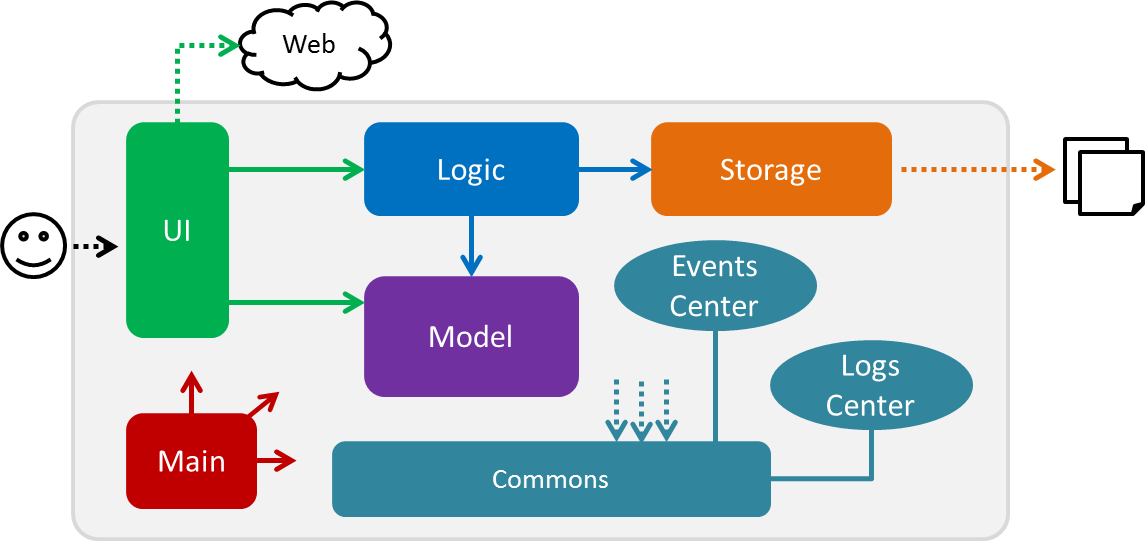
The Architecture Diagram given above shows the high-level design of the Deadline Manager.
3.1.1. Components
The Deadline Manager consists of two shared components and four core components.
3.1.2. Shared components
-
Main: The entry point of the App. -
Commons: A collection of classes used by the other components in the App.
3.1.3. Core components
Each of the four core components
-
Defines its API in an
interfacewith the same name as the Component. -
Exposes its functionality using a
{Component Name}Managerclass.
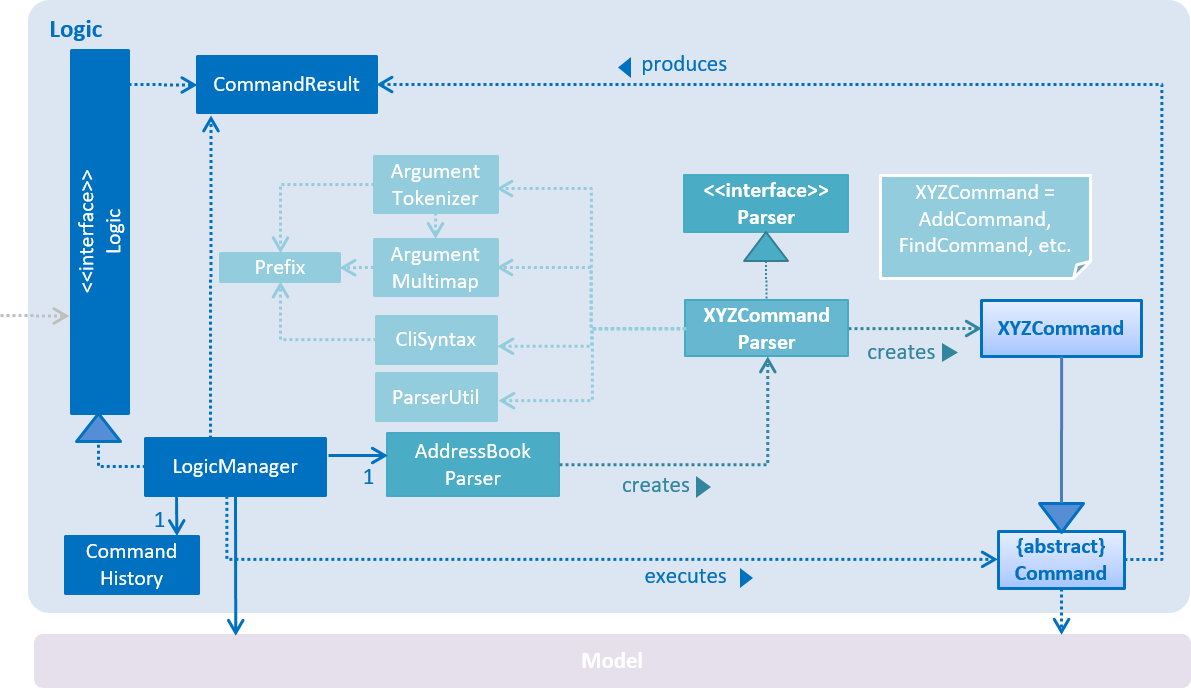
For example, the Logic component (see the class diagram given below) defines it’s API in the Logic.java interface and exposes its functionality using the LogicManager.java class.
3.1.4. Events-driven design
The Sequence Diagram below shows how the components interact for the scenario where the user issues the command delete 1.
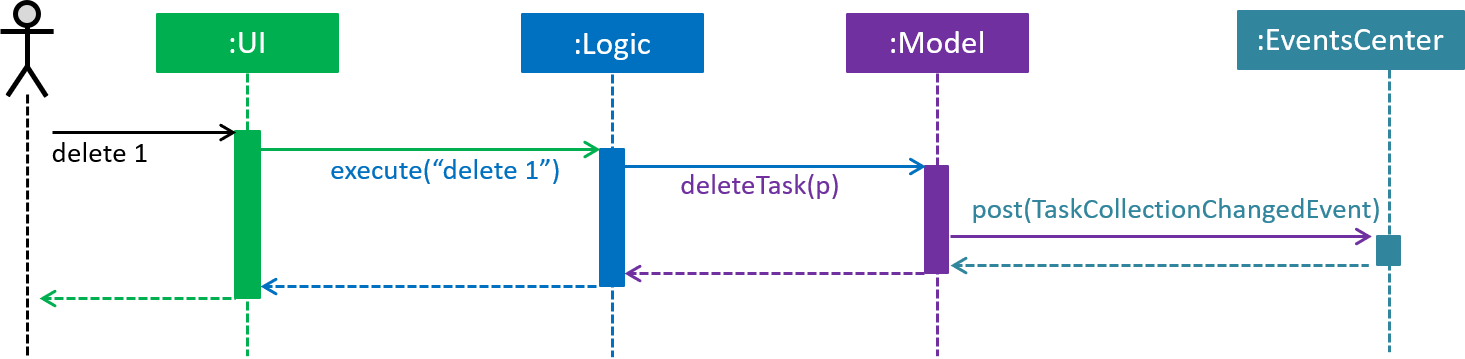
delete 1 command (part 1)
Note how the Model simply raises a TaskCollectionChangedEvent when the deadline manager data is changed, instead of asking the Storage to save the updates to the hard disk.
|
The diagram below shows how the EventsCenter reacts to that event, which eventually results in the updates being saved to the hard disk and the status bar of the UI being updated to reflect the 'Last Updated' time.
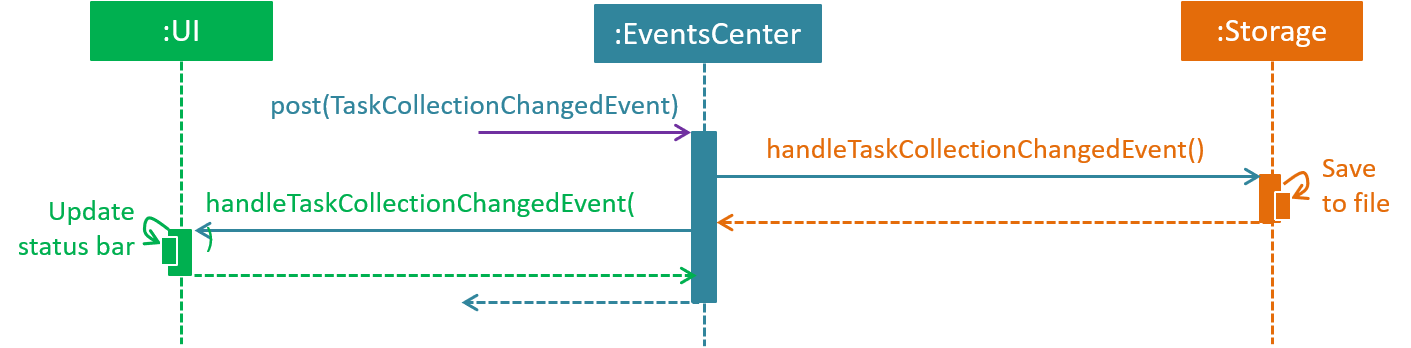
delete 1 command (part 2)
Note how the event is propagated through the EventsCenter to the Storage and UI without Model having to be coupled to either of them. This is an example of how this Event Driven approach helps us reduce direct coupling between components.
|
The .pptx files used to create diagrams in this document can be found in the diagrams folder. To update a diagram, modify the diagram in the pptx file, select the objects of the diagram, and choose Save as picture.
|
3.2. Main
Main has only one class called MainApp. It is responsible for:
-
At app launch: initializing the components in the correct sequence, and connecting them up with each other.
-
At shut down: detaching the components and invoking cleanup methods where necessary.
3.3. Commons
Classes used by multiple components are placed in the seedu.address.commons package.
Commons represents a collection of classes used by multiple other components. Two of those classes play important roles at the architecture level.
-
EventsCenter: This class (written using Google’s Event Bus library) is used by components to communicate with other components using events (i.e. a form of Event Driven design) -
LogsCenter: This class is used by components to write log messages to the App’s log file.
3.4. UI component
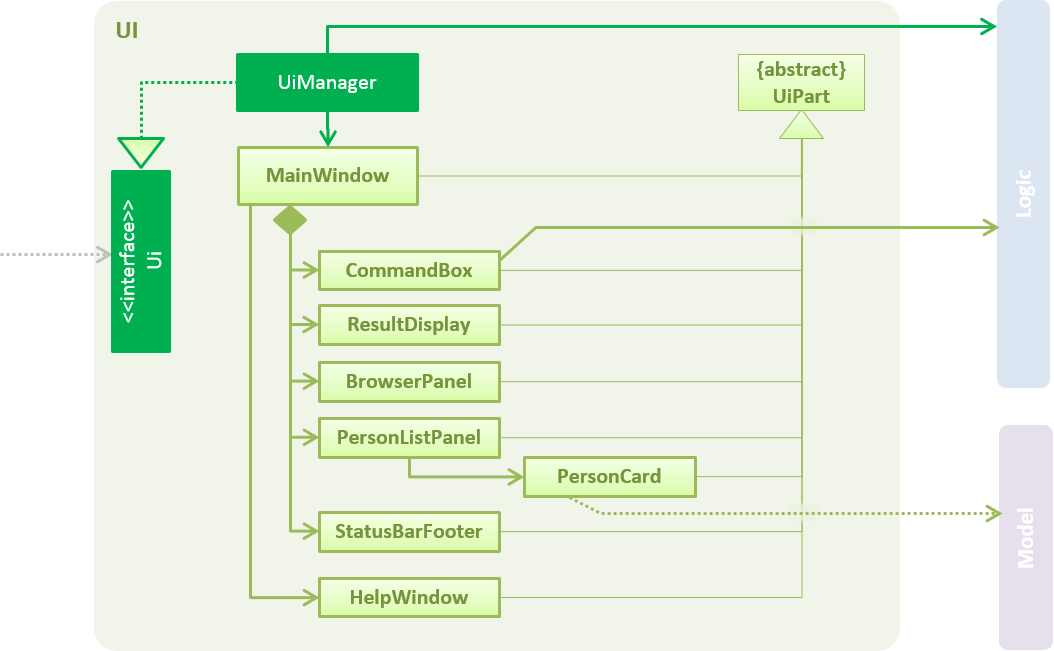
API : Ui.java
Figure 5 shows the class diagram of UI.
The UI consists of a MainWindow that is made up of parts e.g.CommandBox, ResultDisplay, TaskListPanel, StatusBarFooter, BrowserPanel etc. All of these, including the MainWindow, inherit from the abstract UiPart class.
The UI component uses JavaFx UI framework. The layout of these UI parts are defined in matching .fxml files that are in the src/main/resources/view folder. For example, the layout of the MainWindow is specified in MainWindow.fxml
The UI component
-
Executes user commands using the
Logiccomponent. -
Binds itself to some data in the
Modelso that it can automatically update when data in theModelchanges. -
Responds to events raised from various parts of the App and updates the UI accordingly.
3.5. Logic component
API :
Logic.java
Figure 6 above shows the class diagram of Logic.
-
Logicuses theTaskCollectionParserclass to parse user commands. -
This results in a
Commandobject which is executed by theLogicManager. -
The command execution can affect the
Model(e.g. adding a task) and/or raise events. -
The result of the command execution is encapsulated as a
CommandResultobject which is passed back to theUI.
As an example, given below is the Sequence Diagram for interactions within the Logic component for the execute("delete 1") API call.
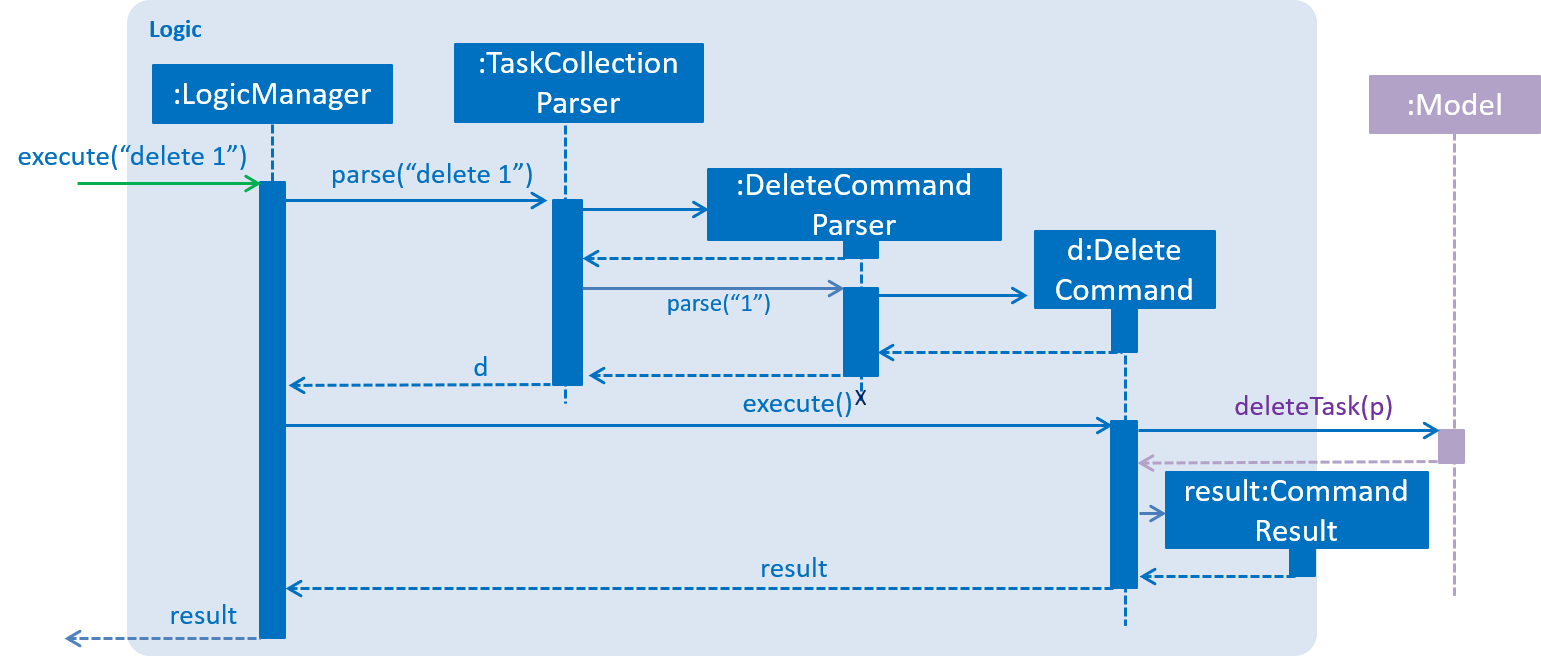
delete 1 Command-
Logicuses theTaskCollectionParserclass to parse the delete command. -
This results in a
DeleteCommandobject which is executed by theLogicManager. -
The command execution affects the
Modelby deleting a person. -
The result of the command execution is encapsulated as a
CommandResultobject which is passed back to theUI.
3.6. Model component
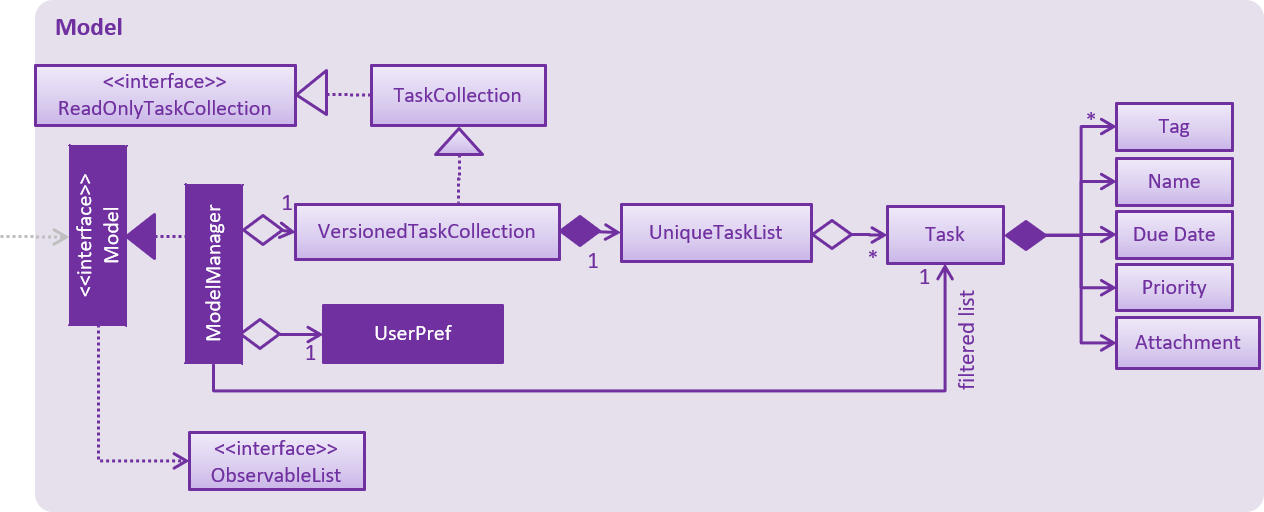
API : Model.java
Figure 8 shows the class diagram for Model.
The Model
-
stores a
UserPrefobject that represents the user’s preferences. -
stores the deadline manager data.
-
exposes an unmodifiable
ObservableList<Task>that can be 'observed' e.g. the UI can be bound to this list so that the UI automatically updates when the data in the list change. -
does not depend on any of the other three components.
As a more OOP model, we can store a Tag list in deadline manager, which Task can reference. This would allow deadline manager to only require one Tag object per unique Tag, instead of each Task needing their own Tag object. An example of how such a model may look like is given below.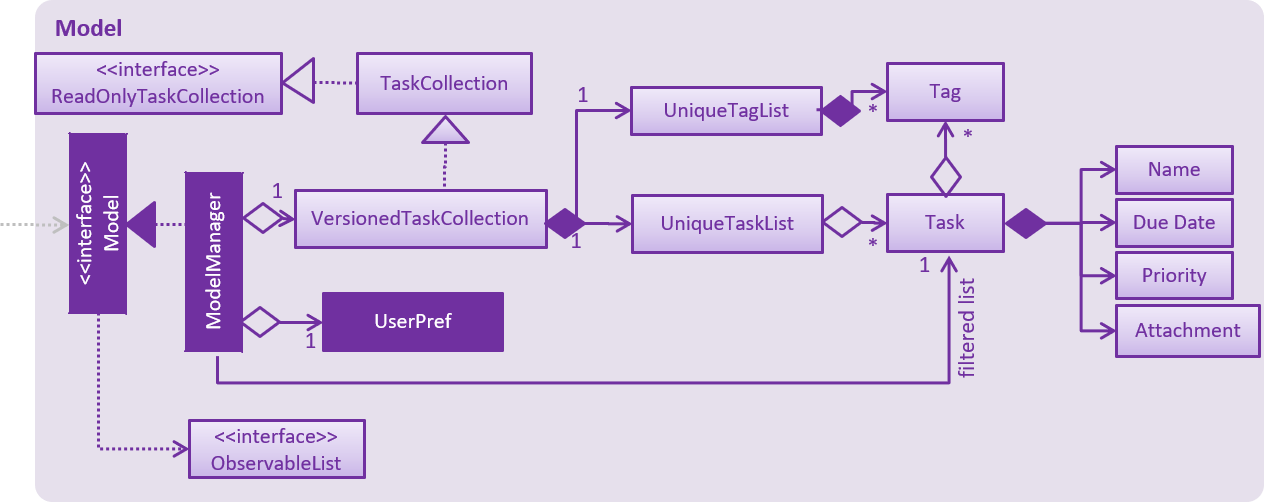
|
3.7. Storage component
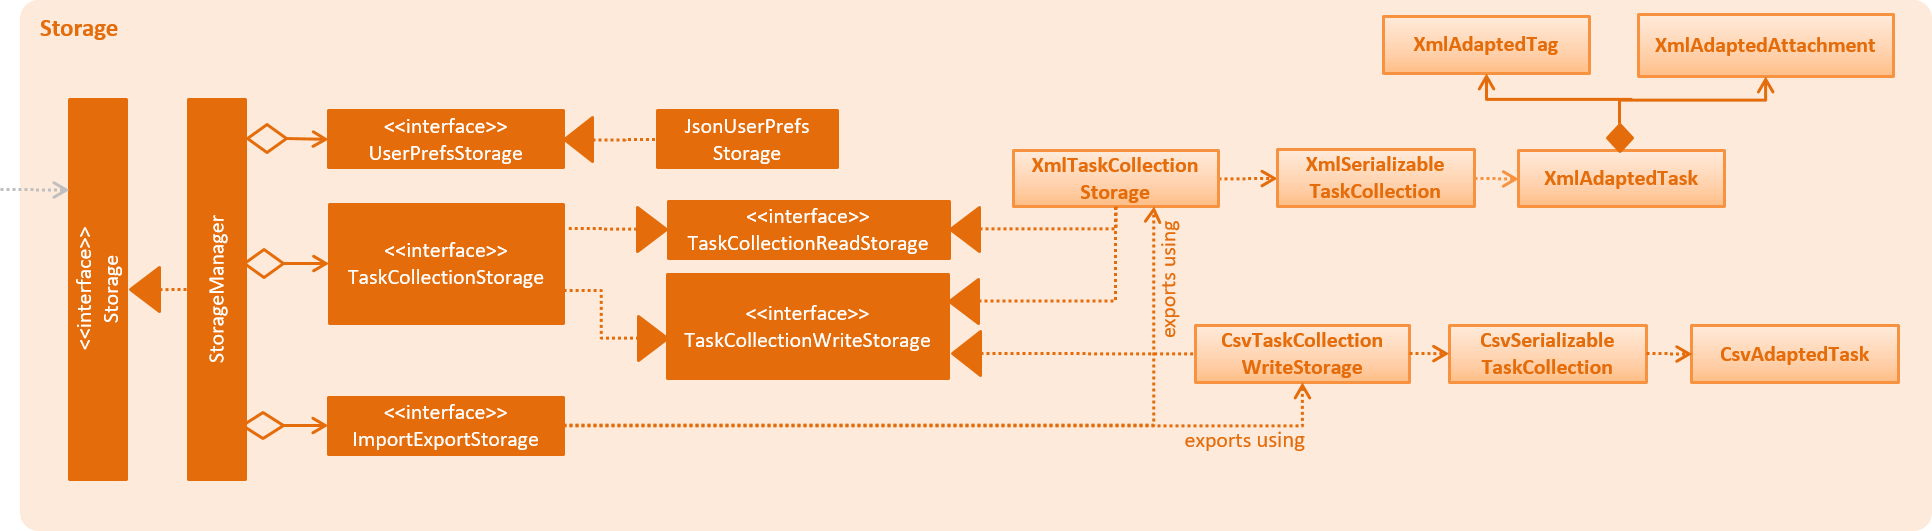
API : Storage.java
Figure 9 illustrates the class diagram of Storage.
The Storage component
-
can save
UserPrefobjects in json format and read it back. -
can save the deadline manager data in xml format and read it back.
-
can export the last view in xml format and import it back.
-
can export the last view in csv format.
-
can handle requests and return output through event-driven architecture. Methods are executed by listening to events such as TaskCollectionChangedEvent.
4. Implementation
This section describes some noteworthy details on how major features are implemented.
4.1. Add feature
The add command enables the user to create a new task with a name and a deadline.
The user can also provide additional information including priority, frequency and tags.
Given below is a sequence of steps, illustrating the interaction between AddCommandParser, AddCommand and Model:
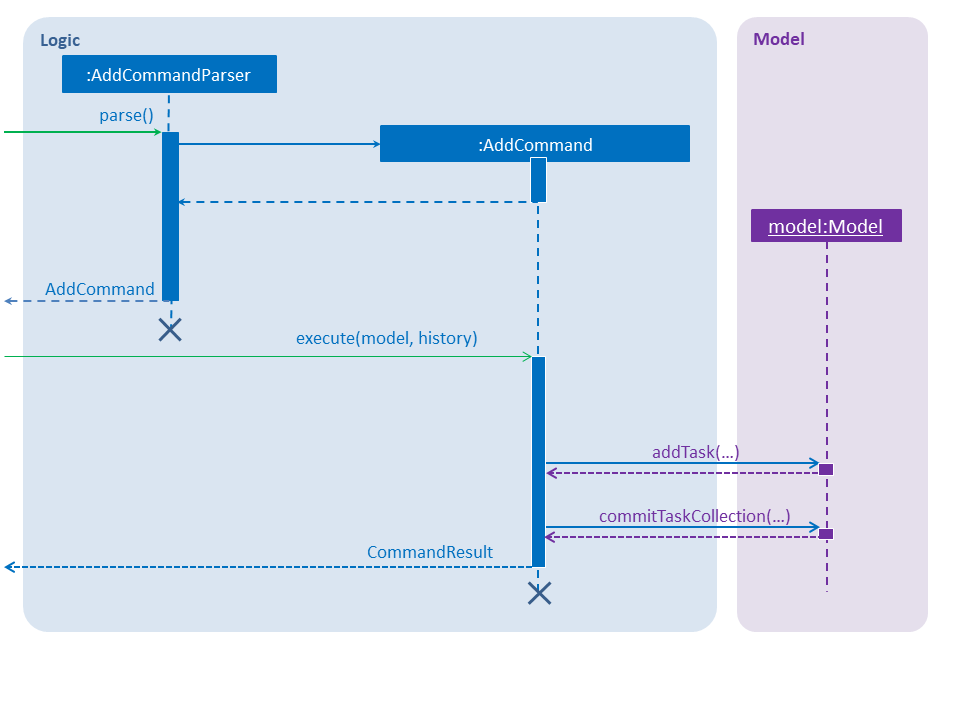
Step 1. The user enters an add command.
Step 2. The AddCommandParser#parse method is invoked.
The AddCommandParser receives the command with the arguments given as a string.
Step 3. The AddCommandParser interprets the arguments and constructs an AddCommand.
Step 4. The AddCommand with a Task specified by the user is returned.
Step 5. The AddCommand#execute method is invoked.
Step 6. The Model is updated: The Model#addTask method and the Model#commitTaskCollection method are invoked.
Step 7. A CommandResult object is returned.
4.2. Complete feature
The complete command provides users a natural way to complete a task:
either delete a task if it is a non-recurring task
or shift the deadline to the next occurrence if the task is a recurring task.
4.2.1. Current implementation
The complete feature is implemented by CompleteCommand and CompleteCommandParser.
After the task specified by the user is retrieved, the CompleteCommand will consider these two cases:
-
If the task is a non-recurring task, it will be deleted.
-
Otherwise, the task will be updated using the following formula:
NewDeadline = OldDeadline + Frequency
4.2.2. Sequence flow
Given below is a sequence of steps, illustrating the interaction between CompleteCommandParser, CompleteCommand, and Model:
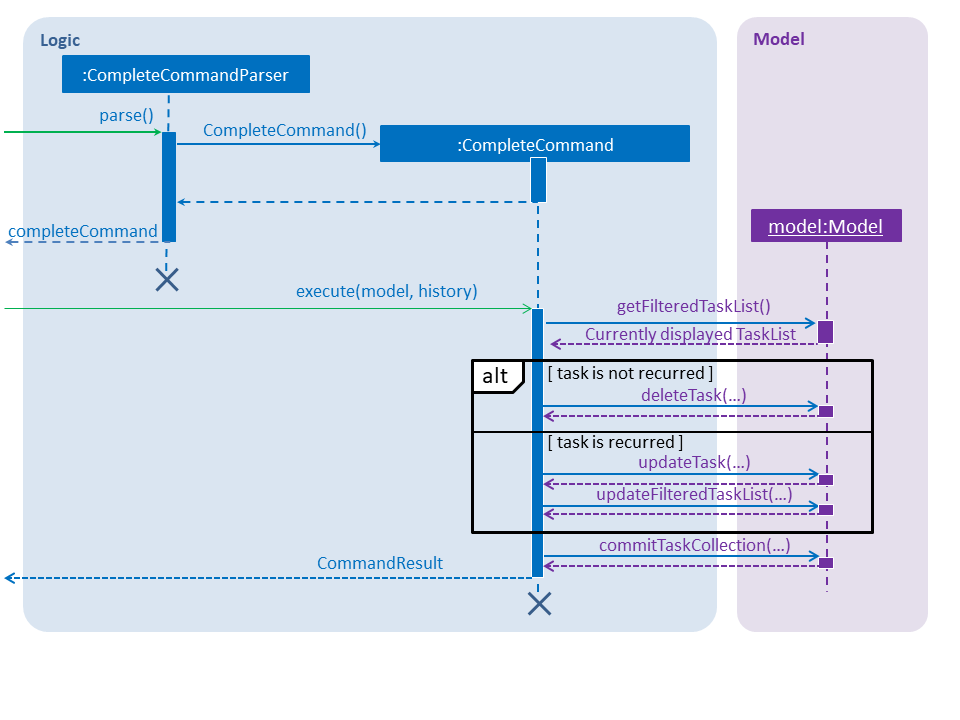
Step 1. The user enters a complete command with the index of a task in the task list.
Step 2. The CompleteCommandParser#parse method is invoked.
The CompleteCommandParser receives the command with the arguments given as a string.
Step 3. The CompleteCommandParser interprets the arguments and constructs a CompleteCommand.
Step 4. The CompleteCommand with the index specified by the user is returned.
Step 5. The CompleteCommand#execute method is invoked.
Step 6. The task identified by the user is retrieved from the Model.
Step 7. The Model is updated:
If the task is a non-recurring task, Model#deleteTask is invoked to delete the task.
Otherwise, Model#updateTask (followed by Model#updateFilteredTaskList) is invoked
with a new Task where the deadline is updated.
Step 8. The Model#commitTaskCollection method is invoked.
Step 9. A CommandResult object is returned.
4.3. Undo/redo feature
4.3.1. Current implementation
The undo/redo mechanism is facilitated by VersionedTaskCollection.
It extends TaskCollection with an undo/redo history, stored internally as an taskCollectionStateList and currentStatePointer.
Additionally, it implements the following operations:
-
VersionedTaskCollection#commit()— Saves the current deadline manager state in its history. -
VersionedTaskCollection#undo()— Restores the previous deadline manager state from its history. -
VersionedTaskCollection#redo()— Restores a previously undone deadline manager state from its history.
These operations are exposed in the Model interface as Model#commitTaskCollection(), Model#undoTaskCollection() and Model#redoTaskCollection() respectively.
Given below is an example usage scenario and how the undo/redo mechanism behaves at each step.
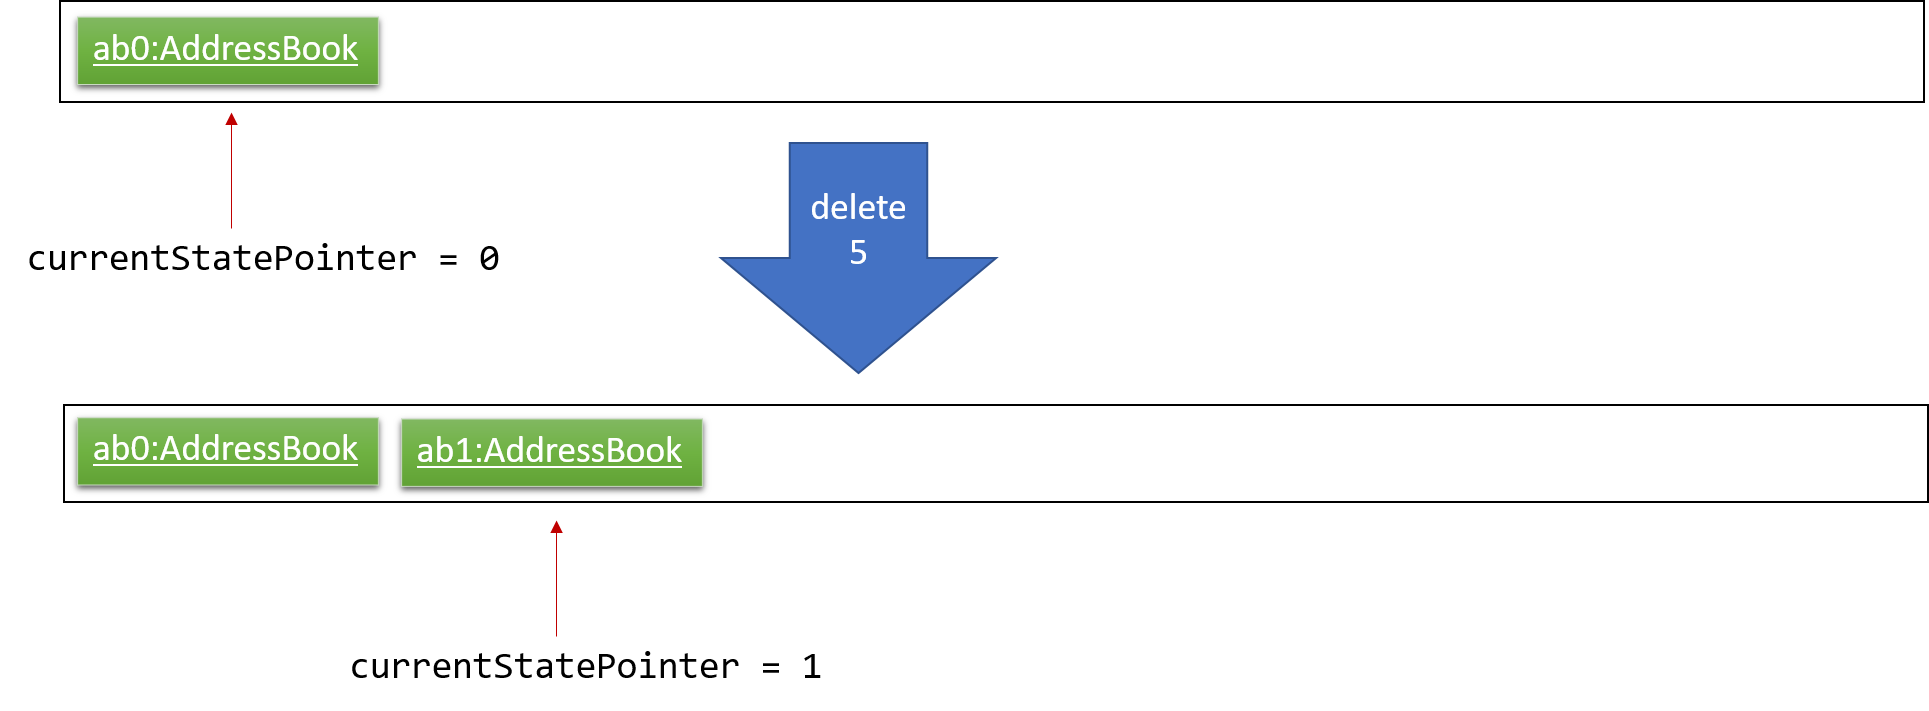
Step 1. The user launches the application for the first time. The VersionedTaskCollection will be initialized with the initial deadline manager state, and the currentStatePointer pointing to that single deadline manager state.

Step 2. The user executes delete 5 command to delete the 5th task in the deadline manager. The delete command calls Model#commitTaskCollection(), causing the modified state of the deadline manager after the delete 5 command executes to be saved in the taskCollectionStateList, and the currentStatePointer is shifted to the newly inserted deadline manager state.
Step 3. The user executes add n/David … to add a new task. The add command also calls Model#commitTaskCollection(), causing another modified deadline manager state to be saved into the taskCollectionStateList.
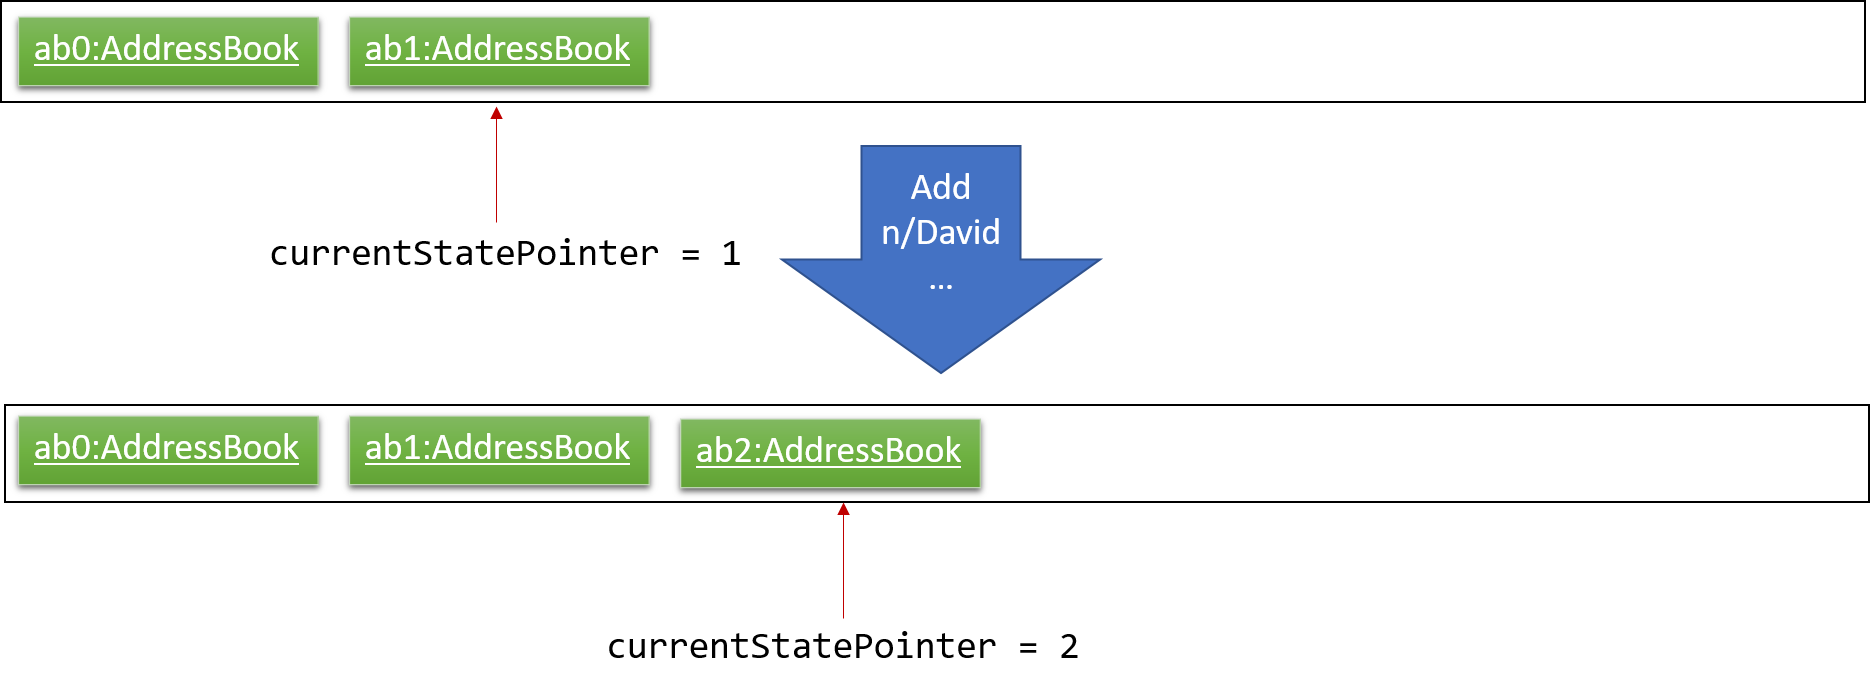
If a command fails its execution, it will not call Model#commitTaskCollection(), so the deadline manager state will not be saved into the taskCollectionStateList.
|
Step 4. The user now decides that adding the task was a mistake, and decides to undo that action by executing the undo command. The undo command will call Model#undoTaskCollection(), which will shift the currentStatePointer once to the left, pointing it to the previous deadline manager state, and restores the deadline manager to that state.
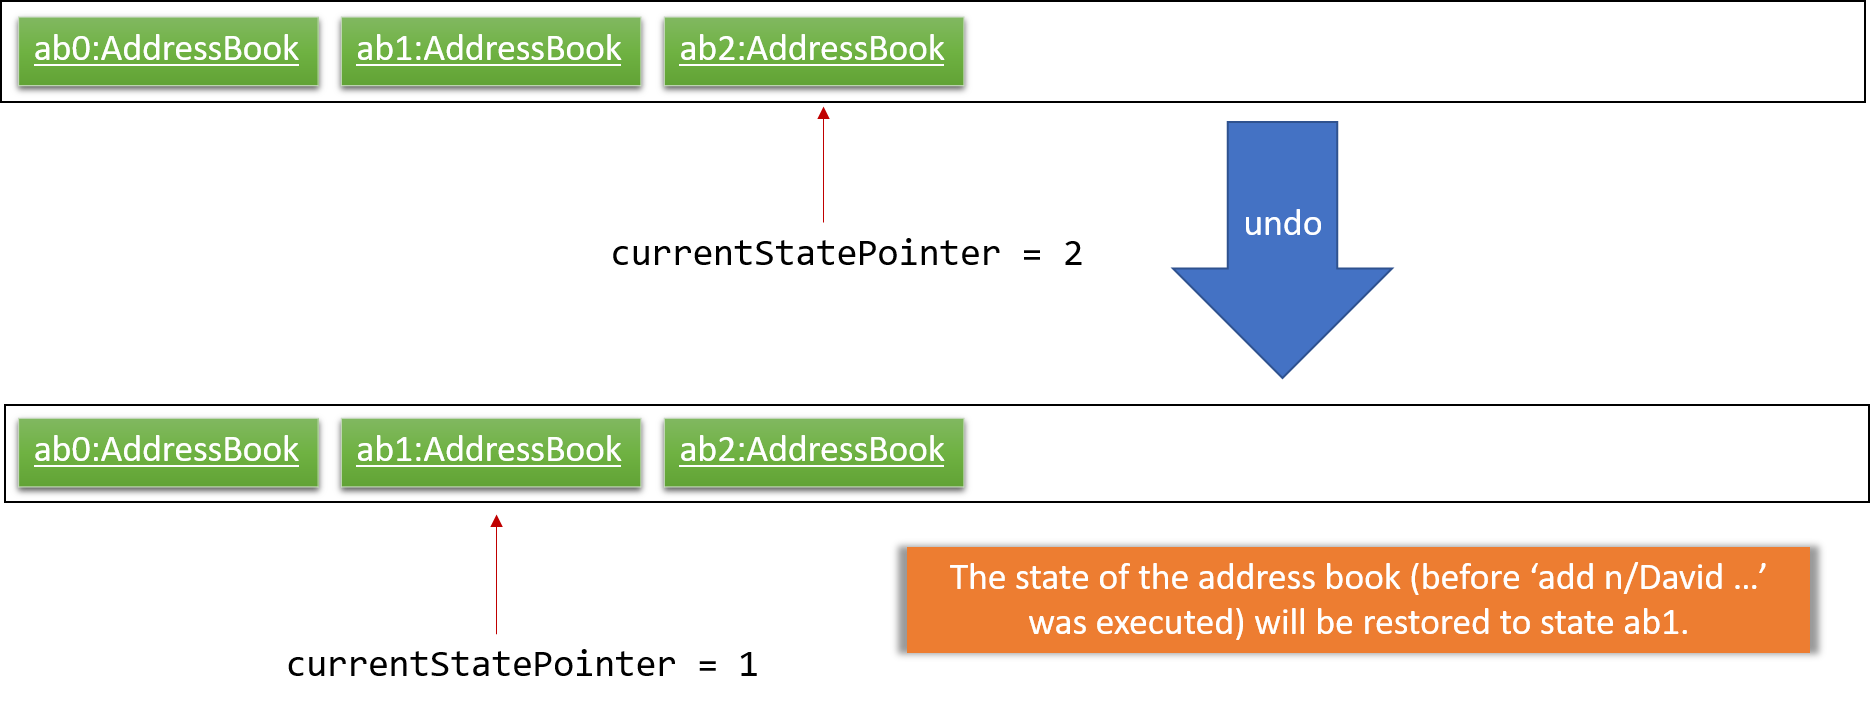
If the currentStatePointer is at index 0, pointing to the initial deadline manager state, then there are no previous deadline manager states to restore. The undo command uses Model#canUndoTaskCollection() to check if this is the case. If so, it will return an error to the user rather than attempting to perform the undo.
|
The following sequence diagram shows how the undo operation works:

undoThe redo command does the opposite — it calls Model#redoTaskCollection(), which shifts the currentStatePointer once to the right, pointing to the previously undone state, and restores the deadline manager to that state.
If the currentStatePointer is at index taskCollectionStateList.size() - 1, pointing to the latest deadline manager state, then there are no undone deadline manager states to restore. The redo command uses Model#canRedoTaskCollection() to check if this is the case. If so, it will return an error to the user rather than attempting to perform the redo.
|
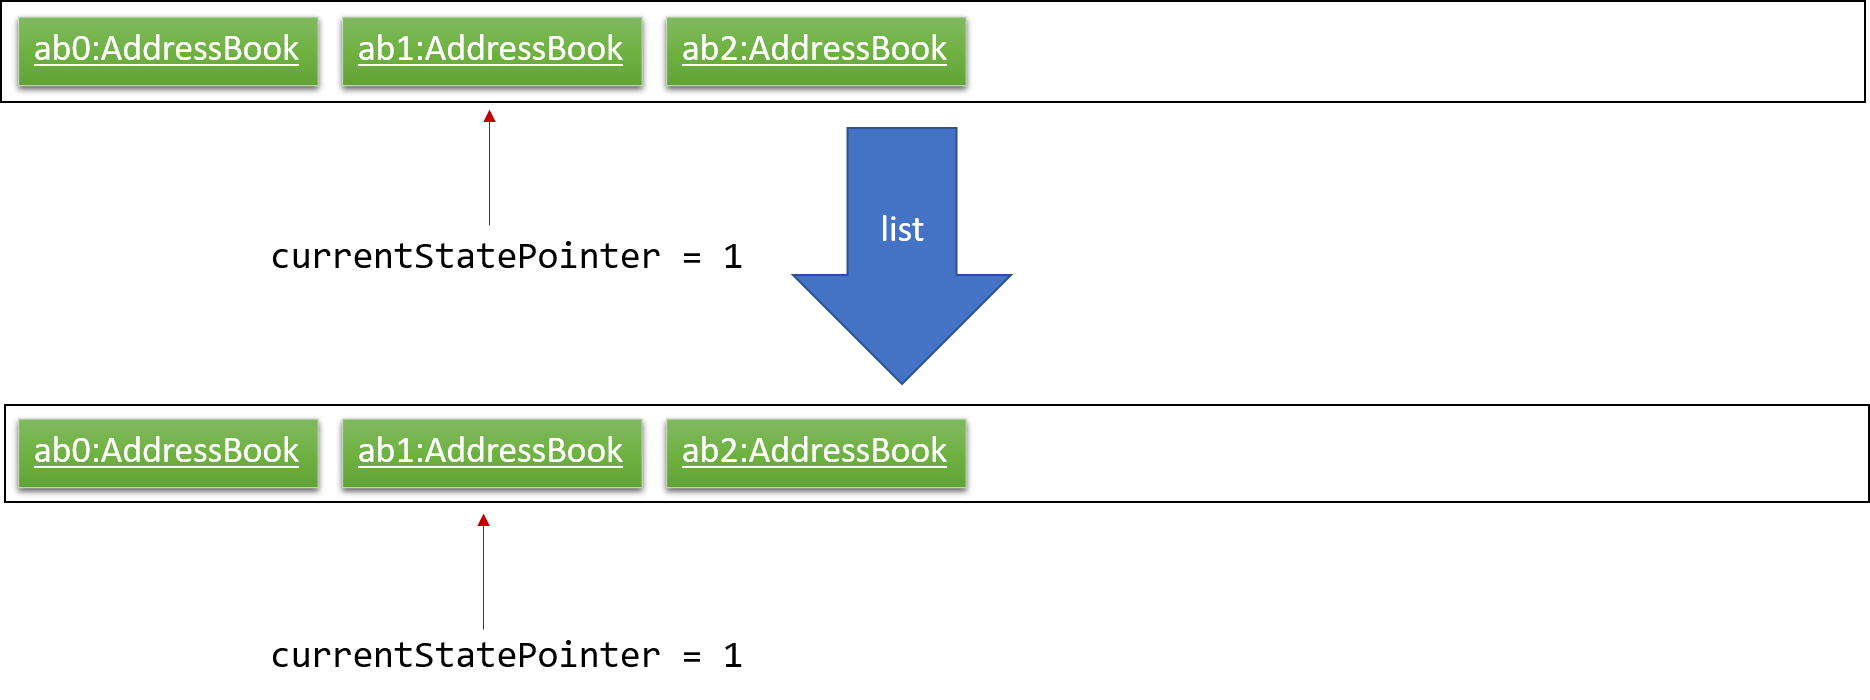
Step 5. The user then decides to execute the command list. Commands that do not modify the deadline manager, such as list, will usually not call Model#commitTaskCollection(), Model#undoTaskCollection() or Model#redoTaskCollection(). Thus, the taskCollectionStateList remains unchanged.
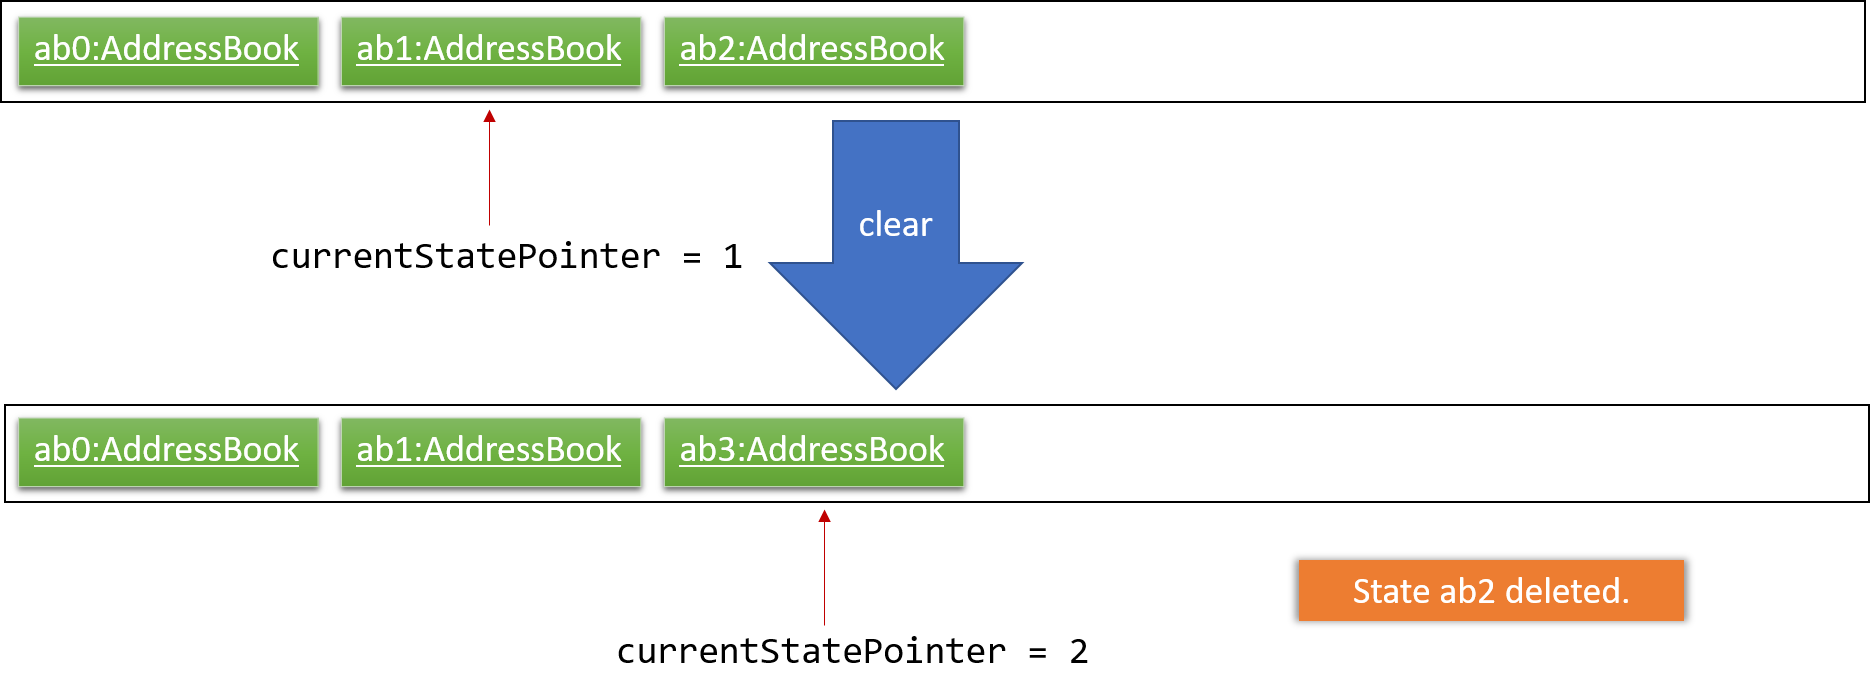
Step 6. The user executes clear, which calls Model#commitTaskCollection(). Since the currentStatePointer is not pointing at the end of the taskCollectionStateList, all deadline manager states after the currentStatePointer will be purged. We designed it this way because it no longer makes sense to redo the add n/David … command. This is the behavior that most modern desktop applications follow.
The following activity diagram summarizes what happens when a user executes a new command:

4.3.2. Design considerations
4.3.2.1. Aspect: How undo & redo executes
-
Alternative 1 (current choice): Saves the entire deadline manager.
-
Pros: Easy to implement.
-
Cons: May have performance issues in terms of memory usage.
-
-
Alternative 2: Individual command knows how to undo/redo by itself.
-
Pros: Will use less memory (e.g. for
delete, just save the task being deleted). -
Cons: We must ensure that the implementation of each individual command are correct.
-
4.3.2.2. Aspect: Data structure to support the undo/redo commands
-
Alternative 1 (current choice): Use a list to store the history of deadline manager states.
-
Pros: Easy for new Computer Science student undergraduates to understand, who are likely to be the new incoming developers of our project.
-
Cons: Logic is duplicated twice. For example, when a new command is executed, we must remember to update both
HistoryManagerandVersionedTaskCollection.
-
-
Alternative 2: Use
HistoryManagerfor undo/redo-
Pros: We do not need to maintain a separate list, and just reuse what is already in the codebase.
-
Cons: Requires dealing with commands that have already been undone: We must remember to skip these commands. Violates Single Responsibility Principle and Separation of Concerns as
HistoryManagernow needs to do two different things.
-
4.4. Import and export feature
The deadline manager supports import and export features. This feature uses 2 components: Storage and Model.
This section will first provide an overview into the components and API involved, before focusing on interactions between the components.
4.4.1. Current implementation
This section will give an overview of how the import and export features work with Model and Storage.
4.4.1.1. Overview of components
Internally, StorageManager implements the following APIs from ImportExportStorage interface:
-
importTaskCollection: Given a filename, imports and returns aTaskCollection. -
exportTaskCollection: Given aTaskCollection, exports and writes to a specified file.
Import/Export uses the same API as reading and saving the working TaskCollection file when exporting. However, additional checks are performed to ensure that the user does not inadvertently overwrite files, or corrupt the Deadline Manager.
StorageManager only handles writing to and reading from file, and relies on ModelManager to decide what data should be read or written.
| An ImportExportExceptionEvent is raised if Deadline Manager fails to read or write files for any reason. |
The complementary ModelManager implements the following APIs necessary for Import and Export:
-
importTaskCollection: Creates and posts a new import request event -
exportTaskCollection: Creates and posts a new export request event.
The request events are posted to the EventCenter, which will dispatch to all subscribed components, such as Storage.
4.4.1.2. Inter-component communication
To facilitate communication between the two components, the deadline manager uses the event-driven model.
An import or export request event is created by ModelManager, and a handler in StorageManager is invoked to handle the event.
After data has been successfully read or written, the response is placed in a DataAvailableEvent for ModelManager to process. Similarly, errors also are passed between the two components using events (such as ImportExportExceptionEvent).
To achieve the above, ModelManager indicates an import/export request by creating these events:
-
ImportRequestEvent: Requests for a new import from file. -
ExportRequestEvent: Requests to create a new export to file.
ModelManager implements these additional methods to handle the responses from Storage:
-
handleImportDataAvailableEvent: Processes the read task collection and merges tasks into the current collection. -
handleImportExportExceptionEvent: Indicates internally that the last import/export request has failed.
It is the responsibility of the Model to feedback to the user in the case of an exception.
|
Similarly, StorageManager returns the result of imports and errors with the following events:
-
ImportExportExceptionEvent: Indicates that an error has occurred with import or export. -
ImportDataAvailableEvent: Indicates that the requested task collection has been read from disk.
StorageManager implements these additional methods to handle requests from Model:
-
handleImportRequestEvent: Processes an import event and reads from file. -
handleExportRequestEvent: Processes an export event and writes to file.
4.4.2. Sequence flow
The above interactions between Model and Storage can be illustrated with the following sequence diagrams.
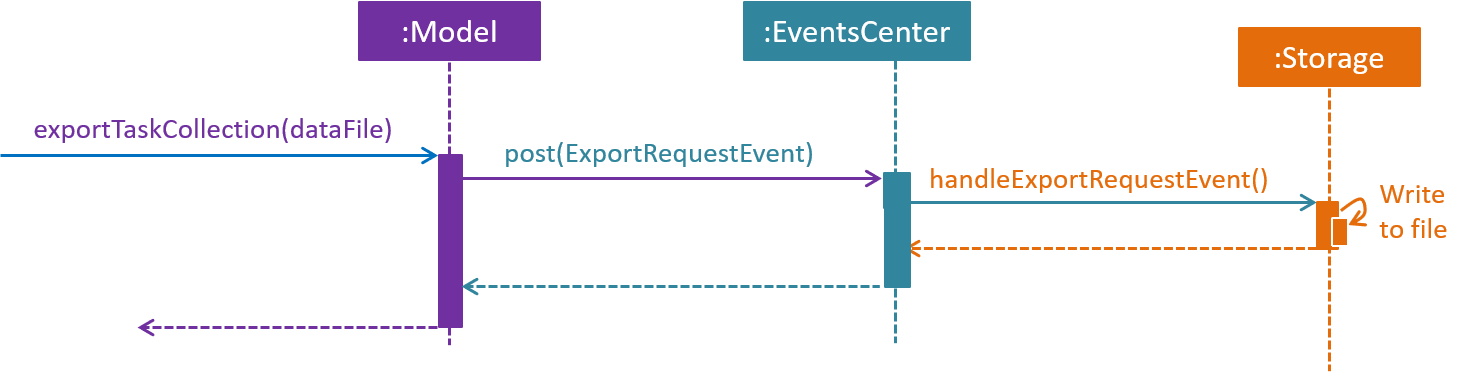
The figure above shows the sequence diagram for the interaction that happens when the user requests to export tasks.
Step 1. The user types in an export command. The Logic component parses the user’s command, and calls ModelManager’s exportTaskCollection.
Step 2. The ModelManager posts an ExportRequestEvent to the EventsCenter.
Step 3. The EventsCenter dispatches the ExportRequestEvent to Storage.
Step 4. Storage handles the ExportRequestEvent and writes to file. At this stage, the export is complete.
A similar interaction is seen when importing from a file.
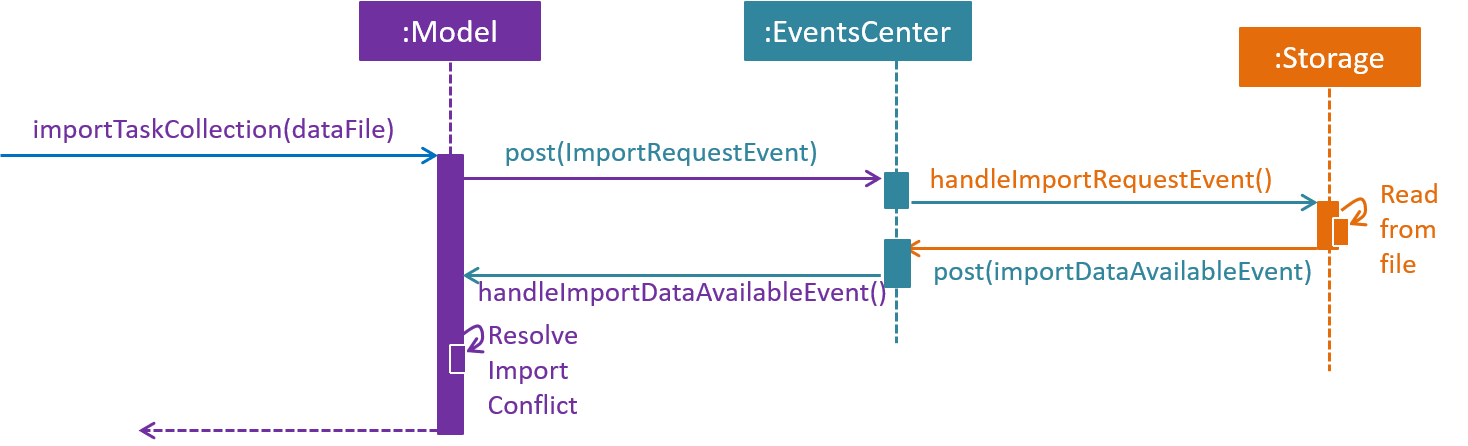
The sequence diagram above shows the interactions that happen when a user attempts to import data from a file. The interactions are similar to export, with an additional step to resolve import conflict.
Step 1. The user types in an import command. The Logic component parses the user’s command, and calls ModelManager’s importTaskCollection.
Step 2. The ModelManager posts the ImportRequestEvent to the EventsCenter.
Step 3. The EventsCenter dispatches the ImportRequestEvent to Storage.
Step 4. Storage handles the ImportRequestEvent, reads from file, then posts a new ImportDataAvailableEvent to EventsCenter to signal that data is available.
Step 5. The EventsCenter dispatches the ImportDataAvailableEvent back to ModelManager.
Step 6. ModelManager takes the imported data and adds it to the Model. If necessary, it also de-conflicts the new entries.
4.4.3. Import conflict resolver
An imported task is deemed conflicting with an existing task if the two tasks compare equal with the internal implementation of Task’s equal method.
If the user attempts to import a new conflicting task, Deadline Manager de-conflicts the task with one of the following resolvers:
-
IgnoreImportConflictResolver: Discards the incoming task in favour of the existing task. -
OverwriteImportConflictResolver: Updates the existing task to reflect the values of the incoming task. -
DuplicateImportConflictResolver: Keep both copies.
The user can specify the de-conflict algorithm with flags. By default, the IgnoreResolver is used.
Given below is a sequence diagram to illustrate the interactions between ModelManager and OverwriteImportConflictResolver. While OverwriteImportConflictResolver is used as an example, the interactions with IgnoreImportConflictResolver and DuplicateImportConflictResolver are similar.
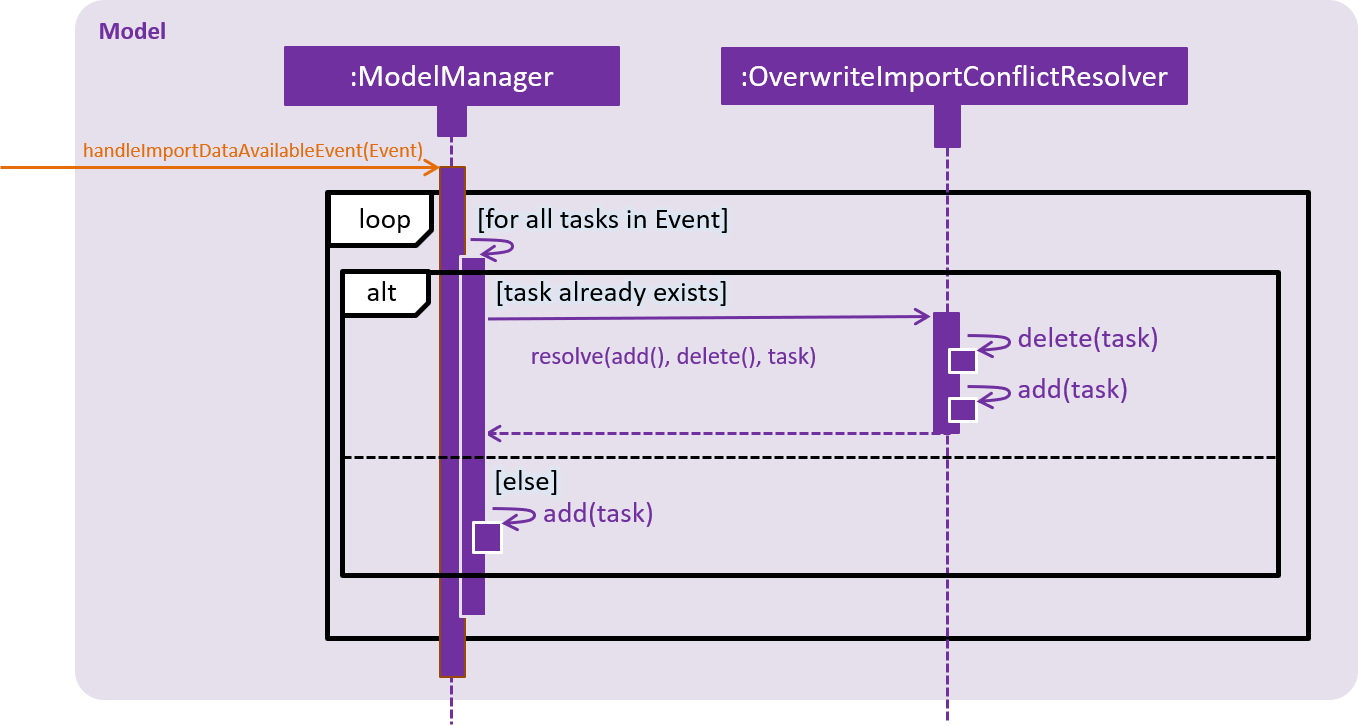
Step 1. After requesting for import, Storage returns the Tasks that are serialised from file through an ImportDataAvailableEvent. This event is dispatched to ModelManager via EventsCenter.
Step 2. ModelManager retrieves the TaskCollection data, and for each task, ModelManager checks whether the task already exists in the Model.
Step 3a. If the task already exists, the functional method resolve(() → add(), () → delete(), task) is invoked. The Functional Programming style is used here, and ModelManager passes a reference to its add and delete methods.
Step 3b. OverwriteImportConflictResolver will first delete() the existing task, before it calls add() on the new one. This behaviour is specific to OverwriteImportConflictResolver. A DuplicateImportConflictResolver will simply add the new entry, while a IgnoreImportConflictResolver will do nothing.
Step 4. Otherwise, if the task doesn’t exist, ModelManager simply adds the task to the model.
4.4.4. CSV format support
The discussion above has been format-agnostic, abstracting away details about the file formats. Deadline Manager supports both eXtensible Markup Language (XML) and Comma Separated Values (CSV) format.
The CSV/XML format support is implemented using the respective {*}TaskCollectionStorage class. XMLTaskCollectionStorage is able to import and export data, so it implements both TaskCollectionReadStorage and TaskCollectionWriteStorage interface. On the other hand, CSVTaskCollectionStorage can only export data, so it implements only the TaskCollectionWriteStorage interface.
The TaskCollectionReadStorage specifies APIs that is responsible for reading from a file and serialising data into Tasks usable by Model. Classes that implement TaskCollectionReadStorage should support:
-
readTaskCollection: Reads a file and returns aTaskCollectionserialised based on the contents of the file.
The TaskCollectionWriteStorage specifies APIs that is responsible for de-serialising Tasks into a text format to be written to a file. Classes that implement TaskCollectionWriteStorage should support:
-
saveTaskCollection: De-serialises theTaskCollectionand saves the data into a file atfilePath.
As a summary for the CSV/XML format discussion, the class diagram below shows the structure of CsvTaskCollectionStorage and XmlTaskCollectionStorage. This diagram is also replicated in Storage above.
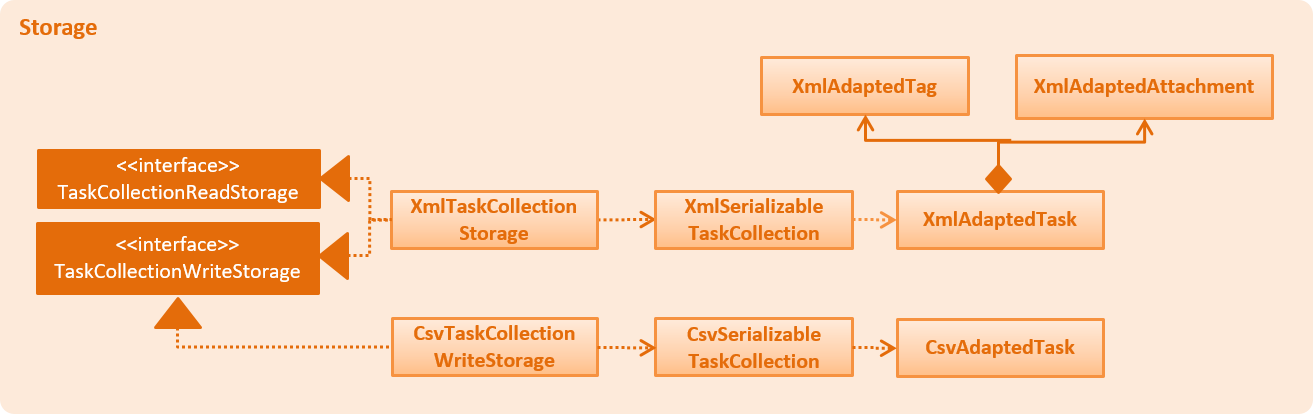
Notably, the CsvTaskCollectionStorage only implements the TaskCollectionWriteStorage, while XmlTaskCollectionStorage implements both.
4.4.5. Design considerations
4.4.5.1. Aspect: Communication between Model and Storage
Both the Model and the Storage components are required for import/export. However, they are separate components, and we need to establish a method of communication between the two components.
-
Alternative 1 (current choice):
Modelis maintained as being separate fromStorage. The event-based style is used: an Import/Export event is created to signal a request, and another Import/Export event is created to signal that the data is ready.-
Pros:
Storageis decoupled fromModel, i.e. changes toModelwill not affect changes toStorage, and vice versa. This is a good OOP practice. -
Cons: It is more difficult to implement and more overhead is incurred in passing data around. Calls are not immediate, and there is no way to immediately tell whether an execution succeeded or failed.
-
-
Alternative 2: Model executes an import/export method in Storage directly.
-
Pros: The data from the import/export request can be retrieved immediately and easily.
-
Cons:
Modelis more tightly coupled withStorage, i.e.ModelandStoragewill no longer be separate components, but will instead know the inner workings of each other.
-
4.4.5.2. Aspect: How to resolve import conflicts
As described in Import conflict resolver, an import conflict arises when the user attempts to import tasks that already exist in Deadline Manager. We need an import conflict resolver to determine how to deal with these tasks.
-
Alternative 1 (current choice): An
ImportConflictResolverclass is implemented to resolve import conflicts. The user specifies which resolver algorithm to use, and the corresponding{Method}ImportConflictResolverobject is created to resolve import conflicts.-
Pros: This provides more flexibility for user to define how to resolve imports. Additionally, this is better Software Engineering practice as it follows the Single Responsibility Principle: the
ImportConflictResolverobject is responsible only for its own algorithm. -
Cons: It is more difficult to implement an entirely separate
ImportConflictResolverclass, complete with separate sub-classes for different algorithms.
-
-
Alternative 2: Use an
enumto implement ImportConflictResolver. TheImportConflictResolverenum provides a pre-defined selection of algorithms that the user can specify.-
Pros: There is no need to implement separate classes. Since the
ImportConflictResolverenum is only useful within Model, it reside within Model as a private variable. -
Cons: If/else statements are required to determine which algorithm should be used. Additionally, an
ImportConflictResolverimplemented this way cannot be easily reused or extended.
-
4.4.5.3. Aspect: How to support different file formats
As Deadline Manager supports multiple file formats, it is essential to consider how to modularise the file formatting component so that Storage can seamlessly process different types of supported files. Furthermore, some formats such as CSV may not support importing, so it is necessary to distinguish between reading and writing operations.
-
Alternative 1 (current choice): Maintain separate
TaskCollectionReadStorageandTaskCollectionWriteStorageinterfaces. Classes that support import/export can choose to supportReadStorage,WriteStorage, or both. This is written in an OOP style, andStorageManageris agnostic to the export format.-
Pros: This provides more flexibility that could support more file formats in the future. With the required API in place, future implementations only need to ensure that they support reading and/or writing. Furthermore, this allows implementations to have the option of supporting either reading or writing, instead of having to support both. This could be a more sensible option for formats like CSV, where importing from CSV might not be as useful as exporting to one.
-
Cons: The behaviour might be a little harder to understand from an end-user’s perspective. For example, in the current implementation, a user can export to CSV, but cannot import from one as only TaskCollectionWriteStorage is implemented.
-
-
Alternative 2: Combine TaskCollectionReadStorage and TaskCollectionWriteStorage into a single interface, so that implementations that support import/export must support both at once.
-
Pros: It is more intuitive for the user, as they can freely import from and export to any format.
-
Cons: It is more difficult to support a new format, as both the reading and writing features need to be supported at once. If a developer wants to implement only either reading or writing, they would violate the Liskov Substitution Principle. Thus, combining the interfaces would make implementation less flexible.
-
4.5. Sort feature
The sort command enables the user to sort the tasks currently being shown according to a user-defined custom comparator.
It is made up of two main components - SortCommandParser and SortCommand
4.5.1. Current implementation
The sort command is facilitated by VersionedTaskCollection.
The sort command exposes the operation updateSortedTaskList to sort the task list.
It is the responsibility of SortCommandParser to parse the user input into a comparator which can compare between two tasks.
Then the comparator is passed onto the SortCommand which sorts the versionedTaskCollection according to the comparator.
A NullPointerException is raised in case the SortCommand receives a null comparator.
|
4.5.2. Sequence flow
Given below is a sequence of steps, illustrating the interaction between SortCommandParser, SortCommand and ModelManager
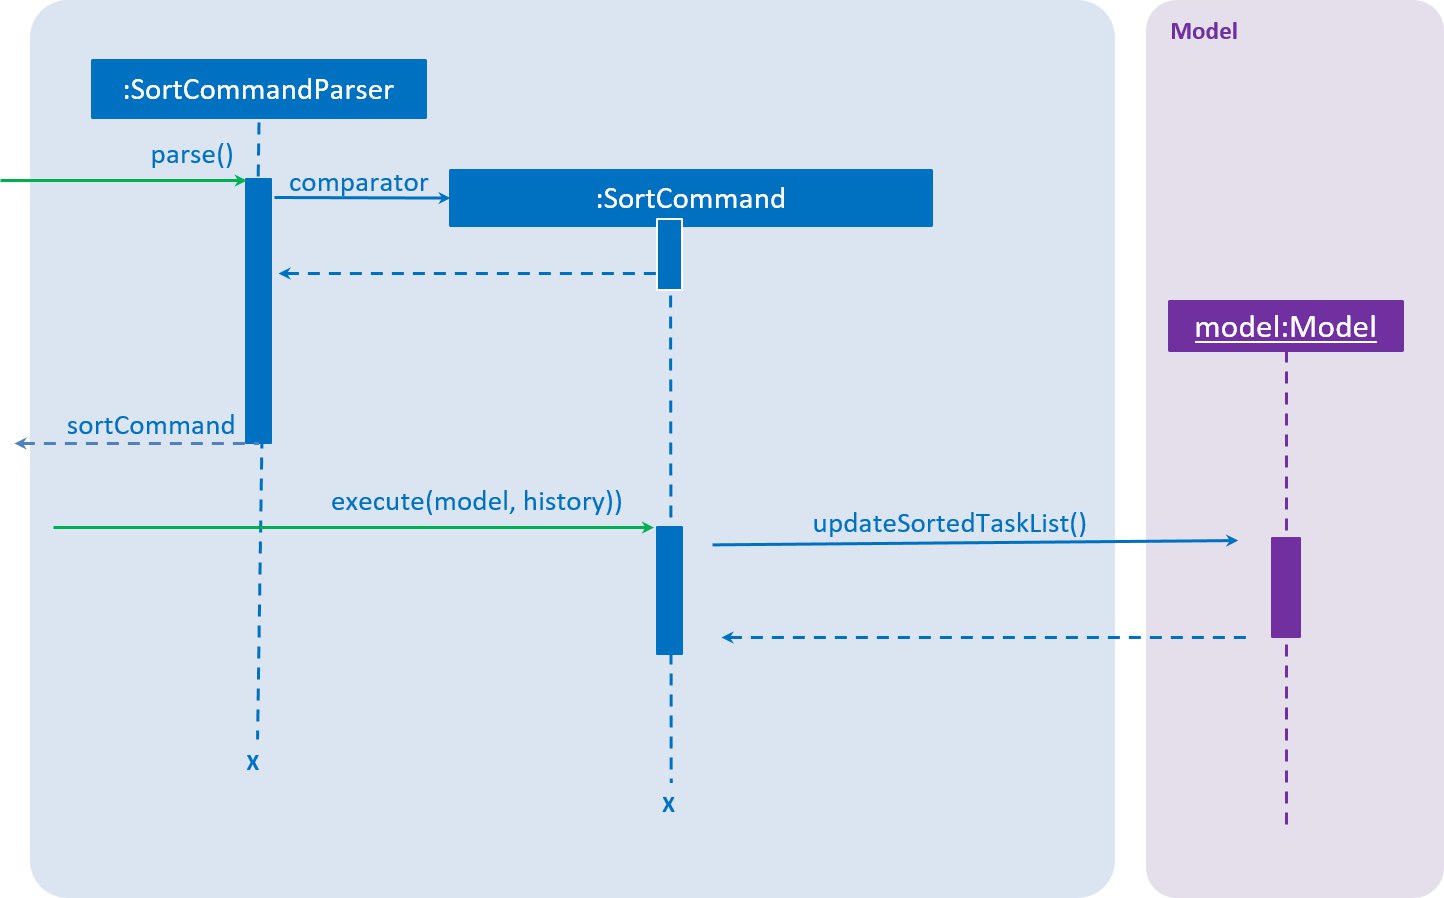
-
The user executes the sort command along with providing a user-specified comparator.
-
The
SortCommandParserreceives the command with the user comparator given as a string. -
The
SortCommandParserparses the string into a valid comparator and calls theSortCommandwith this comparator provided. -
The
SortCommandcalls theupdateSortedTaskListAPI method ofModelManager -
The method
updateSortedTaskListsorts theversionTaskCollectionusing JavaFx sort method
4.5.3. Implementation of sort parser
SortCommandParser implements Parser<> interface. The most essential portion of SortCommandParser, which is chaining of comparators is shown below:
public SortCommand parse(String args) throws SimpleParseException {

    Comparator<Task> comparator = Comparator.comparing(Task::getClass, (a, b) -> {
        return 0; // a default comparator which compares every task equal
    });

    // argumentsArray is an array of strings referring to all the arguments given to the sort command.

    for (String arg: argumentsArray) {
        final String taskField = arg.substring(0, arg.length() - 1);
        final char comparisonChar = arg.charAt(arg.length() - 1);

        switch(taskField) {
        case "n":   // fallthrough
        case "name": {
            if (comparisonChar == '<') {
                comparator = comparator.thenComparing(Task::getName);
            } else {
                comparator = comparator.thenComparing(Taks::getName, Comparator.reverseOrder());
            }
            break;
        }
        case "p":   // fallthrough
        case "priority": {
            if (comparisonChar == '<') {
                comparator = comparator.thenComparaing(Task::getPriority);
            }  else {
                comparator = comparator.thenComparing(Task::getPriority, Comparator.reverseOrder());
            }
        }
        // ... consists of case for other task fields as well
        }
    }
    return new SortCommand(comparator);
}
4.5.4. Design considerations
4.5.4.1. Aspect: Which task list to sort
-
Alternative 1 (current choice): The entire
versionedTaskListis sorted using JavaFx inbuilt sort method.-
Pros: Easy to implement.
-
Cons: Slow in performance.
-
-
Alternative 2: The sorting is done ONLY on the viewable
filteredTaskslist.-
Pros: Fast in terms of performance.
-
Cons: Requires significant changes to the codebase since sorting the
filteredTasksrequires it to be modifiable.
-
4.5.4.2. Aspect: How to sort for tags
-
Alternative 1 (current choice): The sort command takes in user input so that the user can specify the priority order of tags.
-
Pros: Provides immense flexibility to the user. Also follows Law of Demeter / Law of Least Knowledge since the
Tagmodel itself does not know that it can be compared. -
Cons: The flexibility comes at the cost of making sorting by tags complex for newbie users.
-
-
Alternative 2: The sorting is done in a pre-defined manner, example sorting tasks according to their alphabetical order of tags.
-
Pros: Easier to implement and simpler for newbie users.
-
Cons: Not useful for the user in many situations. Disobeys the Law of Demeter / Law of Least Knowledge since the
Tagmodel will know that it can be compared with other tags.
-
4.6. Filter feature
The deadline manager supports a very expressive filtering system. The filtering system can be utilized with the filter command.
The filtering system is designed with two primary goals:
-
Expressiveness: Complex ways of filtering tasks can be expressed in the command format and be understood by the program.
-
Terseness: The amount of user input required to express a filter is as little as possible.
4.6.1. Overview
When a user invokes the filter command (e.g. filter t:CS2101 & n:Assignment), the following steps are taken by the program:
-
Extract the text describing the filter operation (e.g.
t:CS2101 & n:Assignment) -
Parse the text describing the filter operation into a predicate (i.e.
Predicate<Task>) -
Apply the predicate on the model (this simply calls
Model#updateFilteredPersonList(), which internally leverages on JavaFX’sFilteredListclass to provide filtering by predicate)
Step 1 is performed by the AddressBookParser class, and no special actions need to be taken by the filtering system.
Step 3 is performed by the FilterCommand class. It is a simple operation that simply delegates the task to Model#updateFilteredPersonList().
When executing any modifying commands on a filtered list, the filter will be removed after that command (so all tasks will be shown). Modifying commands are those commands that modify the deadline manager’s content (e.g. add, delete, edit and clear). This design decision has been made because modifying a task might cause a task to no longer remain satisfy a filter.
|
The overwhelming majority of code for the filtering system comes from step 2, which is performed by the FilterCommandParser class. The ability to parse complex filter descriptions into usable predicates forms the core of the filtering feature, and this ability makes the filtering system very flexible.
In the rest of this guide that describes the filtering system, we use the term filter expression to refer to the full filter operation that the user typed (e.g. t:CS2101 & n:Assignment, or even t:CS2101 & ( n:Assignment | n:Homework) & p<3), and the term filter unit to refer to substrings of the filter expression that represent single indivisible predicates (e.g. t:CS2101, or n:Homework).
There are four components to parsing the filter operation:
-
A boolean expression parser that understands the high-level syntax of the filter expression and digests the filter expression into filter units
-
A parser that splits each filter unit (e.g.
t:CS2101) into its three (or four) constituent parts if possible (e.g.t,:,CS2101) — this is the lambda expression in the sequence diagram below, which resides in theFilterCommandParserclass -
A parser that splits set-based fields (e.g.
CS2101,CS2103) into individual keywords (this applies only to set-based fields (tags and attachments)) — this is referred to as the set parser, and is implemented as a static method in a utility class -
A method for each field (e.g.
Name,Deadline,Priority,Tag) that interprets the parts of the splitted filter unit in the context of that particular field, and returns the predicate that is required — this is referred to as the field-specific parser, and is implemented as a static method in each filterable field
The second component in the list above also accepts a filter unit that contains the third part alone (e.g. CS2101) without the other two parts — this is known as the simplified filter unit syntax. Also, when filtering by a set-based field, the filter unit can be splitted into four parts instead of three (e.g. t=:CS2101,CS2103 will be plitted as t, =, :, CS2101,CS2103), and the additional symbol (= in this case) is used to specify how sets are compared. These will be explained in more detail below.
|
A general string tokenizer (this is the StringTokenizer class in the parser subdirectory) is shared by parts 1 and 2 to split the filter expression into tokens.
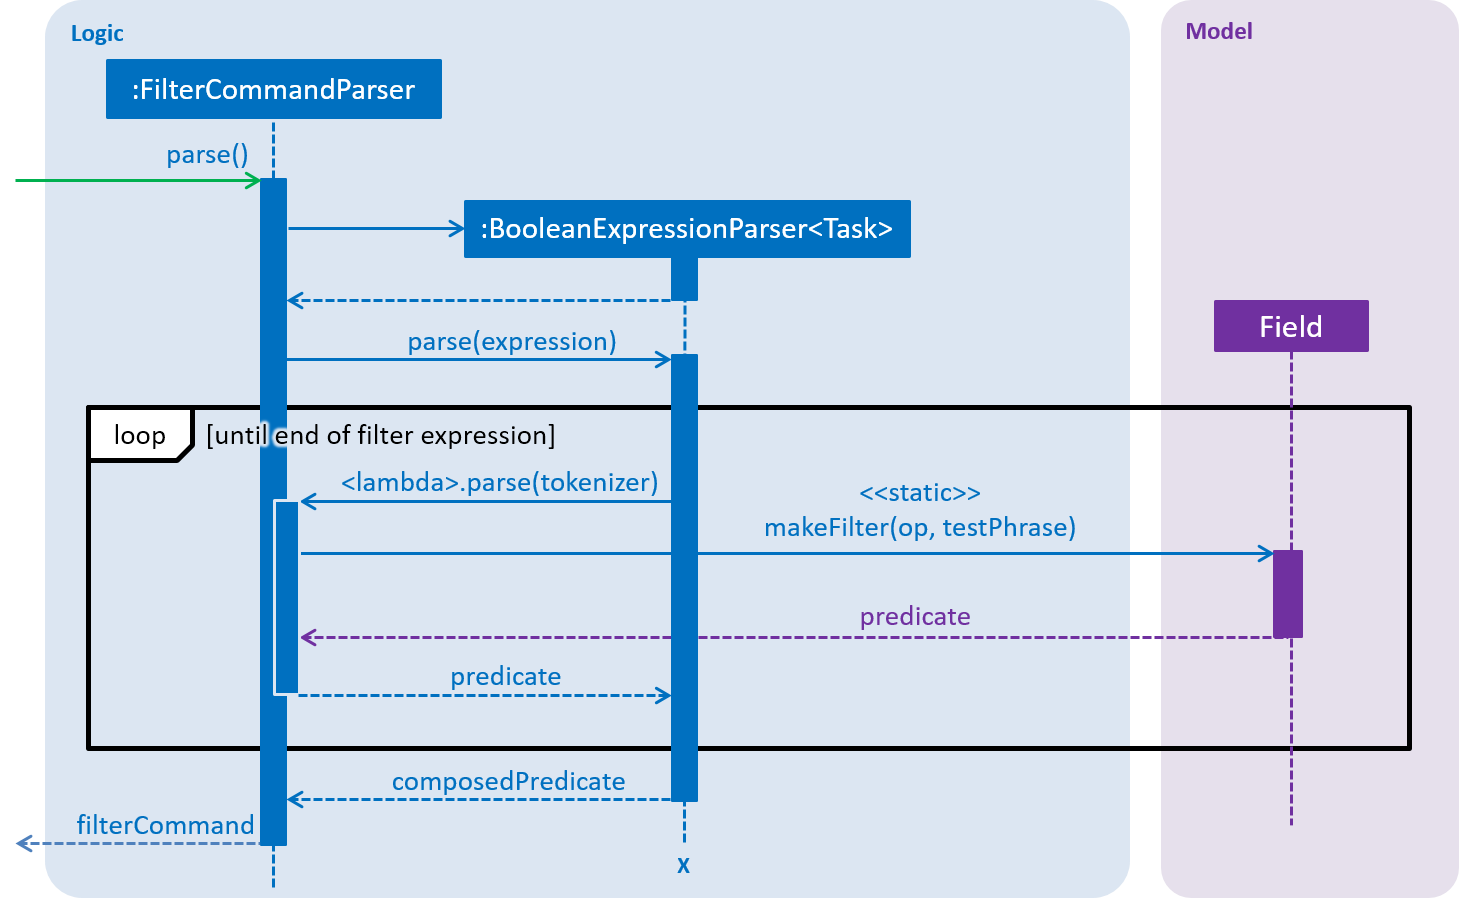
The above diagram shows the simplified sequence of operations to parse a filter expression into a predicate for non-set-based fields. Take note of the following simplifications in the sequence diagram above:
-
"Field" represents any filterable field —
Name,Deadline,Priority, orFrequency. -
Strictly speaking, the "loop" is not actually a loop. As the boolean expression parser parses the filter expression, it invokes the lambda expression whenever a filter unit is encountered. For simplicity, the sequence diagram above hides the complexity within the boolean expression parser.
-
The construction of the
tokenizerobject is omitted so as to give focus to the interaction between the three components. TheBooleanExpressionParseractually constructs aStringTokenizerfrom the givenexpression(which is aString), before entering the loop. This sameStringTokenizeris fed into the lambda expression every time a filter unit is encountered.
| Set-based fields are described in Section 4.6.5, “Set parser”. |
The sections below describe the string tokenizer and the aforementioned four components in more detail.
4.6.2. String tokenizer
This is represented by the class seedu.address.logic.parser.tokenizer.StringTokenizer.
This class is not to be confused with java.util.StringTokenizer.
|
This class is initialized with the whole filter expression, and can be queried for a token multiple times — each query consumes and returns the next available token, in a similar way to java.util.Scanner.
There are two ways to consume tokens using the string tokenizer:
-
Consume a text string. This is used for consuming tokens that are intended to be textual (e.g.
t,CS2101). Consumption of text strings is quote-aware — if the text string is quoted using single or double quotes, the text string would be consumed as a single token, even if it contains spaces or special characters. This is useful when the user wants to search for a name that contains those characters. -
Consume a token by a regular expression. This is used for consuming symbolic tokens (e.g.
:,|,&,().
When unambiguous, adjacent tokens need not be separated by whitespace. This is usually the case when consuming a token specified by a regular expression. This works because when consuming a token, it is often possible to know where the token ends even in the absense of whitespace (e.g. when encountering a matching closing quote or an operator symbol).
The StringTokenizer class is also used in two other places — in the ArgumentTokenizer class to tokenize arguments specified in the usual syntax for most other commands (e.g. add n/Assignment 2 d/1/1/2018 p/1), and in the SetUtil class to parse comma-separated set-based filter expressions (i.e. tags and attachments).
|
4.6.3. Boolean expression parser
This is represented by the generic class seedu.address.logic.parser.tokenizer.BooleanExpressionParser<T>, and it is a general boolean expression parser that is designed to be unaware of the syntax of individual filter units.
The following operators are recognized (highest precedence first):
-
!: Logical negation (NOT) of two predicates -
&or&&: Logical conjunction (AND) of two predicates -
|or||: Logical disjunction (OR) of two predicates
Parentheses (( and )) are also recognized and respected, and they may be nested to arbitrary depth. When two predicates are adjacent, the & operator is inserted between them. This allows for simpler filter expressions (especially when combined with the simplified filter unit syntax).
The boolean expression parser uses the shunting yard algorithm to provide precedence-respecting parsing of the filter expression.
The boolean expression parser functions as follows:
-
The boolean expression parser is constructed with the filter expression, and it constructs a
StringTokenizerinstance from the given filter expression. -
When the start of an operand (i.e. filter unit) is encountered, it hands over the
StringTokenizerinstance to the filter unit parser (this is defined in theFilterCommandParserclass). The filter unit parser determines the field name, and then uses the field-specific parser to construct the predicate (i.e.Predicate<Task>instance) that the filter unit represents. This predicate is returned to the boolean expression parser.
Application of operators (i.e. !, &, |) is done by the boolean expression parser itself (i.e. without delegating the work to other classes).
4.6.4. Filter unit parser
The filter unit parser is written as a lambda expression inside the FilterCommandParser class. This lambda expression then calls FilterCommandParser#createFilterUnit, which contains most of the logic for the filter unit parser. There are two reasons for placing the filter unit parser in the FilterCommandParser class:
-
The filter unit parser parses syntax that is specific to filters only, and it cannot be easily adapted for other uses.
-
It frees both the boolean expression parser and the field-specific parser from having to depend on the
FilterCommandParserclass.
There are three possible ways to express a filter unit:
-
The full syntax — this allows for specifying the field for comparison and the method of comparison to be used
-
The extended full syntax for sets — this is like the full syntax, but enhanced with a way to specify how to compare sets
-
The simplified syntax — this improves terseness and reduces cognitive overhead
The following diagram describes a filter unit that is specified using the full syntax:

The following diagram describes a filter unit that is specified using the extended full syntax for sets:

As shown in the diagram above, a filter unit (using the full syntax or extended syntax) consists of these parts:
-
The field identifier, which identifies the field (e.g. name or deadline) that is being filtered on
-
The test phrase, which represents the value or keyword that tasks are being compared to
-
The filter operator, which describes how the identified field is compared to the test phrase (for set-based fields, this describes how each item (tag or attachment) in the identified field is compared to each item in the test phrase) (more details below)
-
(For the extended syntax only) The set operator, which describes the how the set of items (tags or attachments) in the identified field is compared to the set of items in the test phrase, when regarded as a set (more details below)
| The simplified syntax only contains the test phrase, and is explained in a separate section below. |
The filter unit parser distinguishes between the three possible ways to express a filter unit, as per the activity diagram below:
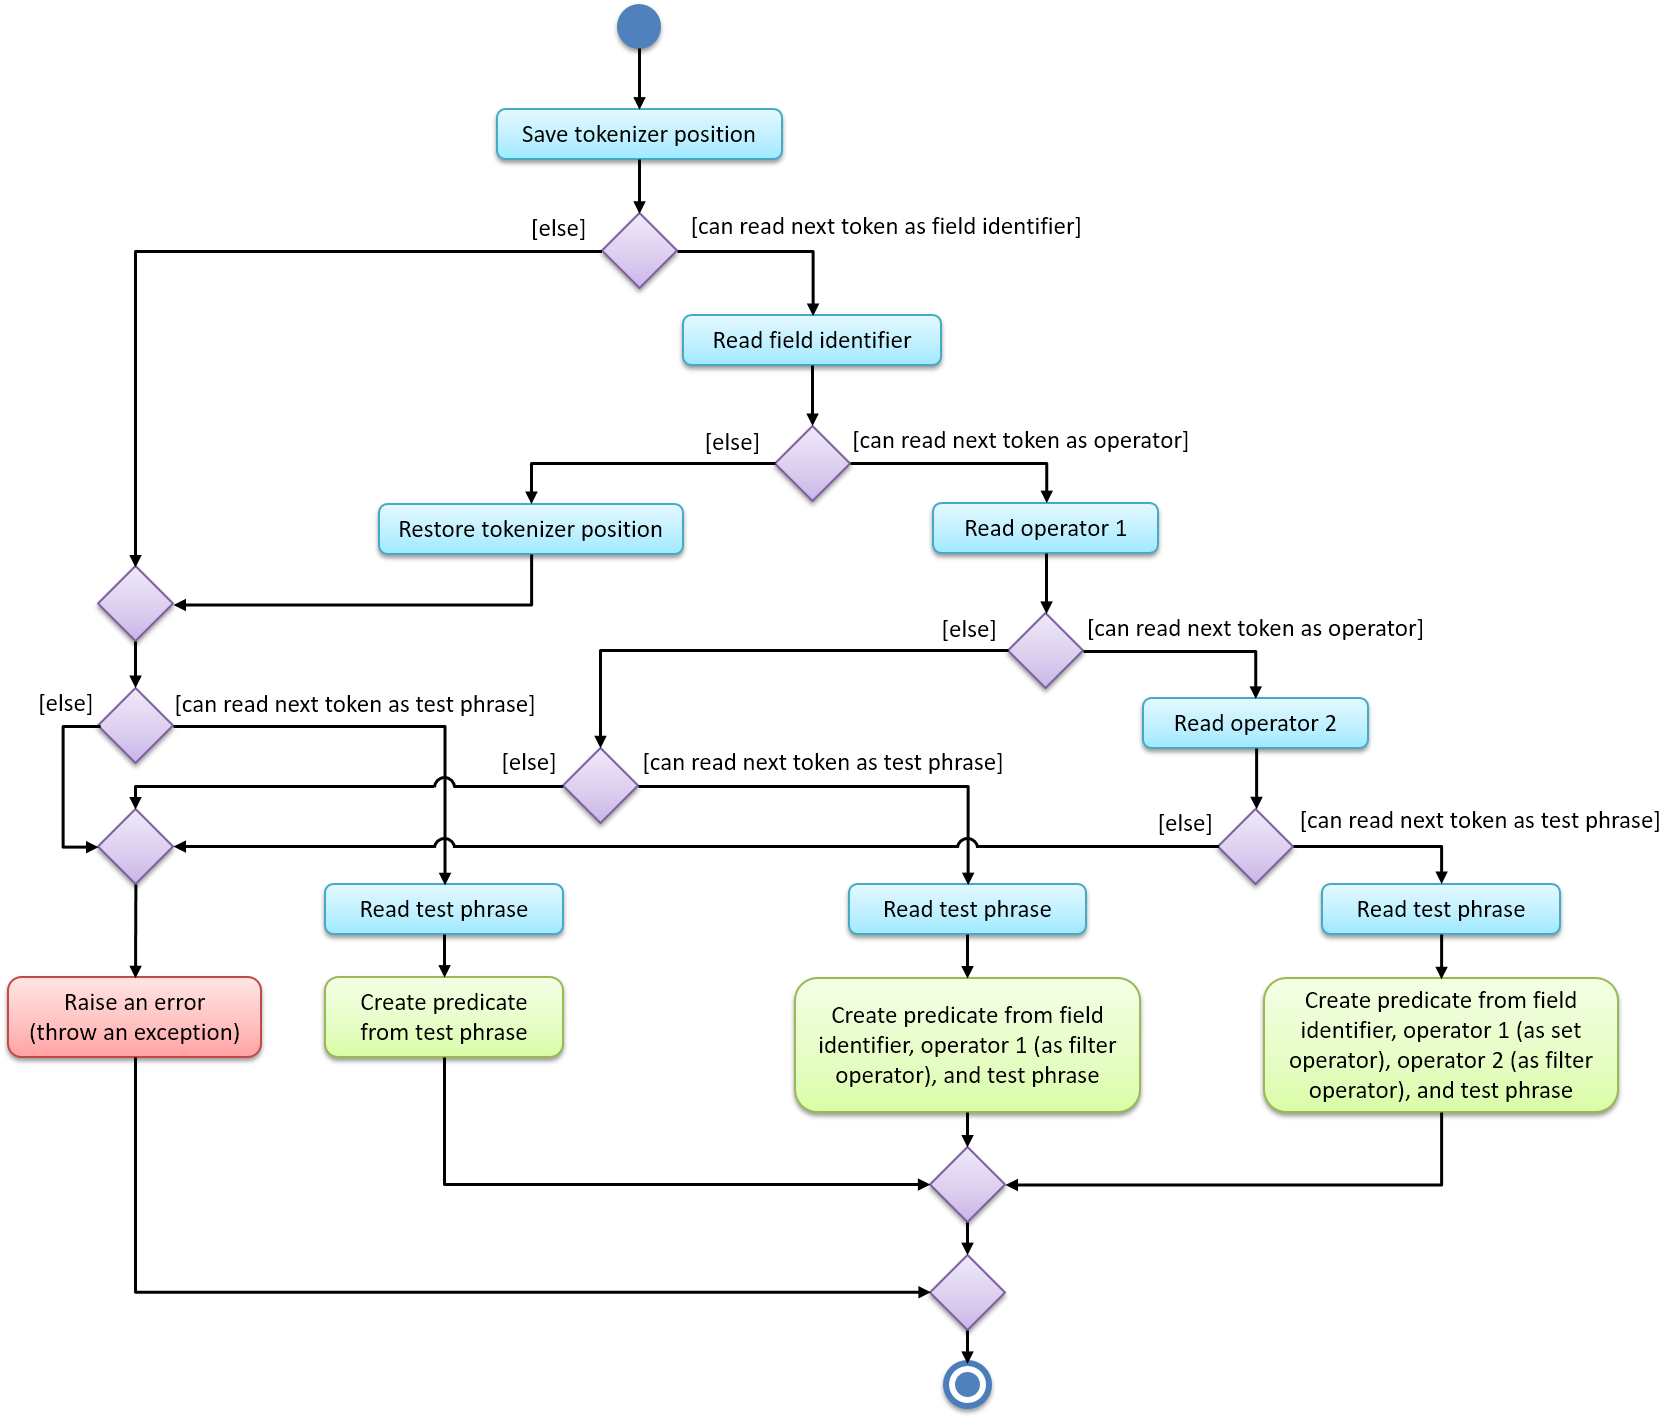
The above diagram demonstrates how each of the three possible ways are distinguished. Note that in the diagram above:
-
A non-quoted field identifier only matches alphabets. There is never a need to use any other kind of character for the field identifier (see Section 4.6.4.1, “Field identifier” below).
-
A non-quoted test phrase only allows alphanumeric characters and the characters
_,-,/,\,,, and.. (The/character allows dates to work, and the,character allows tag lists to work.) The string tokenizer provides the bindings to facilitate this check. If other characters are required, then the test phrase must be placed in quotes (either single or double quotes are acceptable, but they must match). -
An operator (both the filter operator and set operator) only matches
<,=,>, and:. -
The "save tokenizer position" action saves the current read position (of the string tokenizer) into a local variable, so that the position may be restored (thus "rewinding" the string tokenizer) if the "restore tokenizer position" action is encountered.
The four parts of a filter unit are described in the following sections.
4.6.4.1. Field identifier
There are six filterable fields in a task, and each of these fields correspond to two or more field identifiers:
-
norname— the name of the task -
d,dueordeadline— the deadline (i.e. due date) of the task -
porpriority— the priority of the task -
forfrequency— the frequency of the task (in days) -
tortag— the set of tags associated with the task -
aorattachment— the set of attachments associated with the task
Field identifiers that correspond to the same field are equivalent.
4.6.4.2. Test phrase
This is the value or keyword that tasks are compared to, and the syntax of this field depends on the field identifier of this filter unit.
The following is the required syntax for each filterable field:
-
Name: Any text string
-
Deadline: Any date in the form
D/M/YorD/M(will assume current year), for example1/1/2019or16/11 -
Priority: Any valid priority value (i.e. any integer between 0 and 4 inclusive)
-
Frequency: Any valid frequency value (i.e. any integer between 0 and 999 inclusive)
-
Tag set: Any comma-separated list of tags, where each tag can be any text string (e.g.
CS2101,CS2103T) -
Attachment set: Any comma-separated list of attachments, where each attachment can be any text string (e.g.
helloworld.txt,Main.java)
| The rules for quoted strings for the string tokenizer applies here as well, because the same string tokenizer is used here. |
Set-based fields that contain spaces may be specified by placing quotes around those the item with spaces. This means that the whole test phrase must also be quoted with a different type of quote (e.g. a:"test.txt,'hello world.txt'").
4.6.4.3. Filter operator
The filter operator specifies exactly how the task should be compared to the test phrase.
For fields that have a natural total ordering (i.e. deadline, priority and frequency), the <, =, and > operators have their usual mathematical meaning, except that the operators < and > are non-strict. This means that p>2 will return a superset of the tasks returned by p=2.
For textual fields (e.g. name, tag), the <, =, > operators represent substring, equivalence, and superstring relations respectively.
For all fields, = is equivalent to the intersection of < and >.
|
As most users do not usually require such fine-grained control over the filter operator, the : operator, known as the convenience operator, is provided as well. The convenience operator is an alias for one of the other filter operators, and the choice of filter operator depends on the field identifier. For each field, the filter operator that is expected to be most commonly used is chosen as the target for the convenience operator.
The following list shows what the convenience operator means, in the context of each field:
-
Name:
:is an alias for> -
Deadline:
:is an alias for< -
Priority:
:is an alias for> -
Frequency:
:is an alias for< -
Tag set:
:is an alias for> -
Attachment set:
:is an alias for>
4.6.4.4. Set operator
Set-based fields can specify an additional level of comparison - how the task’s set compares with the specified set. It is distinct from the filter operator because the filter operator is used to compare each individual item in the set (in the context of the given field), while the set operator is used to compare at the set level (which is same regardless of which field is being compared).
For set-based fields (e.g. tags), the filter unit parser does not invoke the field-specific parser directly. Instead, control goes through the set parser, which is described in Section 4.6.5, “Set parser” below.
4.6.4.5. Simplified filter unit syntax
The simplified filter unit syntax elides the field identifier and the filter operator. A filter unit (specified with the simplified syntax) is tested against all eligible fields.
All textual and date fields are eligible. This means that the name, deadline, tags, and attachments fields are tested against when the simplified syntax is used. Numeric fields (i.e. priority and frequency) are omitted because they often inadvertently match a test phrase (e.g. when the user attempts to search for tasks which have a name or tag that contains numbers).
Each eligible field is compared as if using the convenience operator (for both the filter operator and set operator, if necessary). A match in any eligible field of a task will cause the task to match this filter unit. Errors in interpreting the test phrase in the context of a field are simply treated as a non-match of the field instead of a hard error (e.g. the test phrase Assignment cannot be interpreted as a deadline, so the deadline field will be skipped when attempting to match this test phrase).
As with the full syntax, the simplified syntax supports quoting the test phrase if special characters are required.
4.6.5. Set parser
The set parser tokenizes the given test phrase, and feeds each item into the field-specific parser separately.
The <, =, > set operators represent subset, equivalence, and superset relations respectively. Each individual item is compared using the specified filter operator as specified in Section 4.6.4.3, “Filter operator”.
Just like the filter operator, there is a convenience set operator (:), and it is an alias for >.
| The set operator is orthogonal to the filter operator, and hence they may be combined in any way. Furthermore, when the set operator is omitted for a set-based field, the convenience set operator is implied. |
The set parser is implemented in the makeFilter() method of the seedu.address.model.util.SetUtil class. It parses the comma-separated list (i.e. the test phrase) using a new instance of StringTokenizer, and then uses reflection to invoke the relevant field-specific parser for each item in the comma-separated list. This is illustrated in the sequence diagram below:
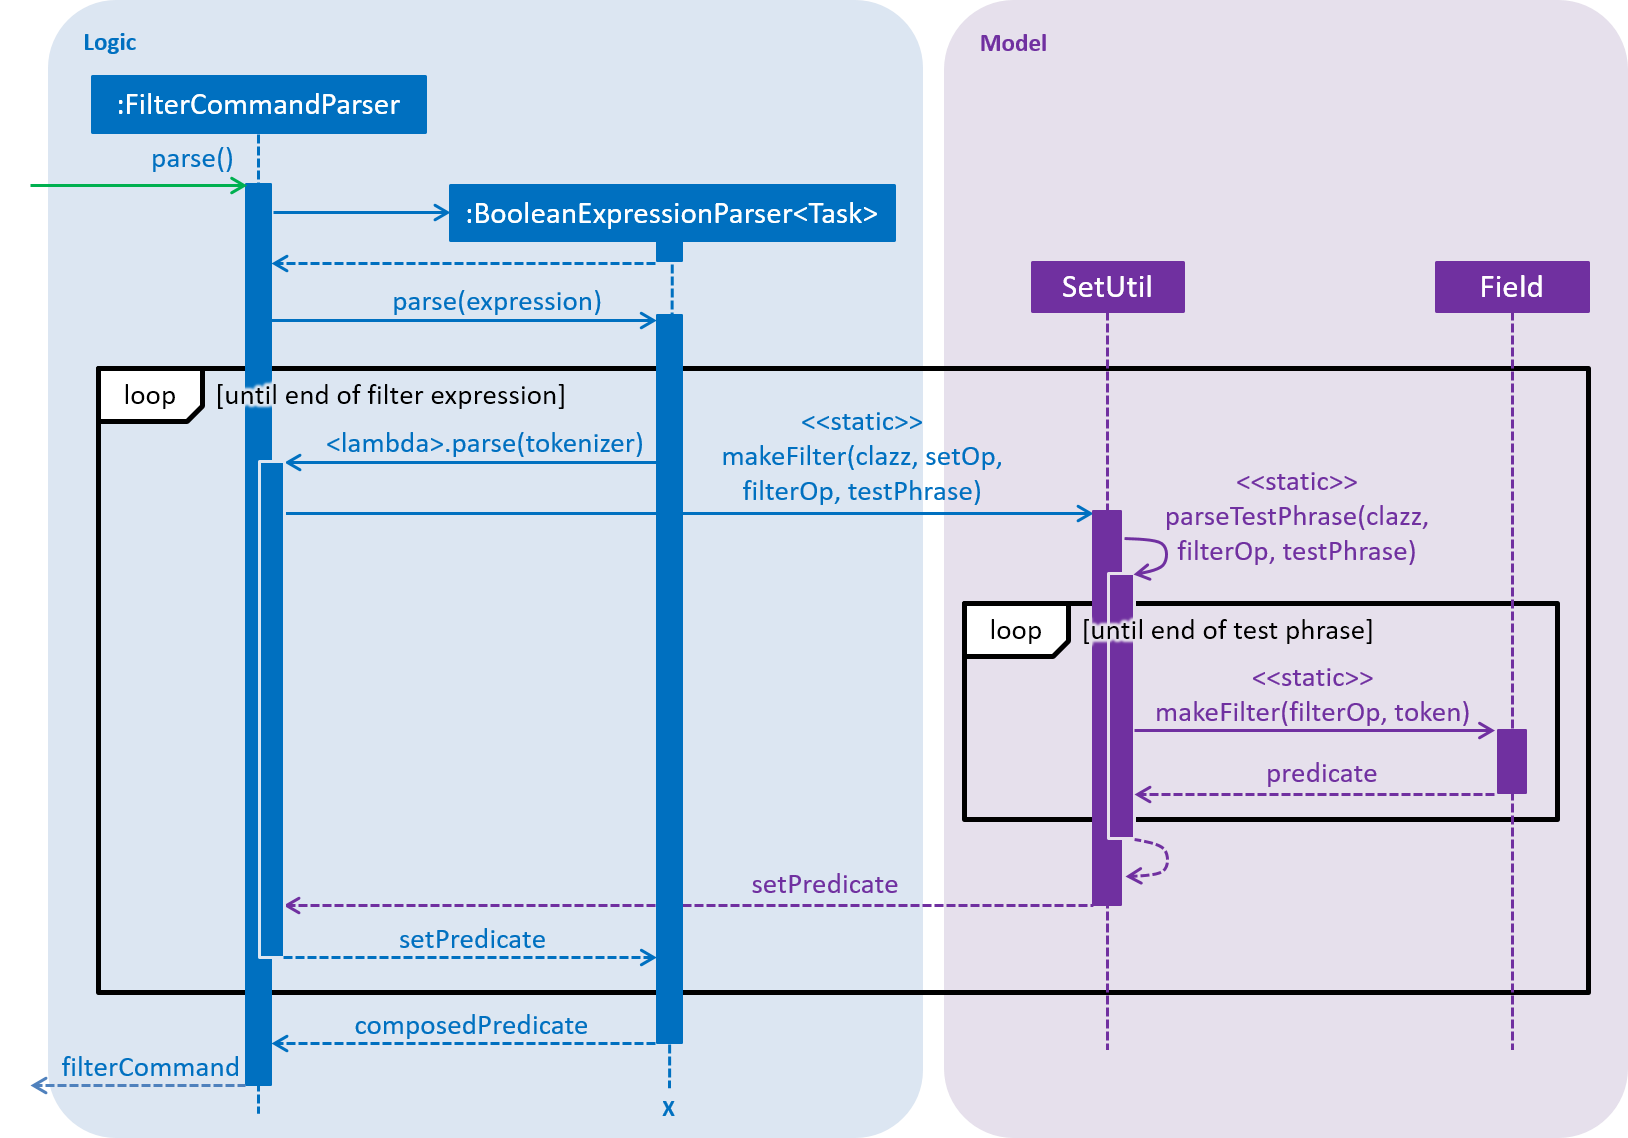
As with the sequence diagram for non-set-based fields, the above diagram is simplified and omits details about how the test phrase is split into tokens using a new StringTokenizer instance. "Field" represents any filterable set-based field — Tag or Attachment.
Reflection is required here because the makeFilter() method is static, and the correct makeFilter() method has to be chosen at runtime (based on the given field).
|
The resultant predicates returned by the field-specific parser are then combined based on the given set operator.
4.6.6. Field-specific parser
As field-specific parsers have to be implemented differently for each filterable field, the design choice was made to place each field-specific parser in its respective field class. More precisely, each field-specific parser is implemented as a static method (makeFilter()) in its field class.
When each filter unit is parsed, it invokes the field-specific parser for the given field identifier. The field-specific parser then creates and returns a predicate from the given filter operator and test phrase.
| Priority values do not compare in the same order as their values as integers. Priority values have this order (from highest to lowest priority): 1 > 2 > 3 > 4 > 0. |
4.6.7. Error messages
As the filter expression syntax can be rather complicated, detecting syntax errors and displaying useful error messages help the user to rectify those errors quickly. When a parse error is detected, the filter command is designed to highlight the offending token and provide an error message customised for that error.
Error conditions are signalled via checked exceptions that inherit from seedu.address.logic.parser.tokenizer.exception.TokenizationException. Those error conditions that are associated with a particular character range in the filter expression inherit from seedu.address.logic.parser.tokenizer.exception.TokenizationMismatchException, which provides the facilities for storing the start and end indices of the offending character range. TokenizationMismatchException itself inherits from TokenizationException. Checked exceptions were chosen because they allow the compiler to enforce that every possible exception is caught, and creating a subclass for each kind of error condition allows for the precise specification (in the throws clause) of the kind of error conditions that can happen in each and every method.
The following inheritance diagram shows the inheritance hierarchy of each kind of exception that can be thrown from parsing a filter expression:
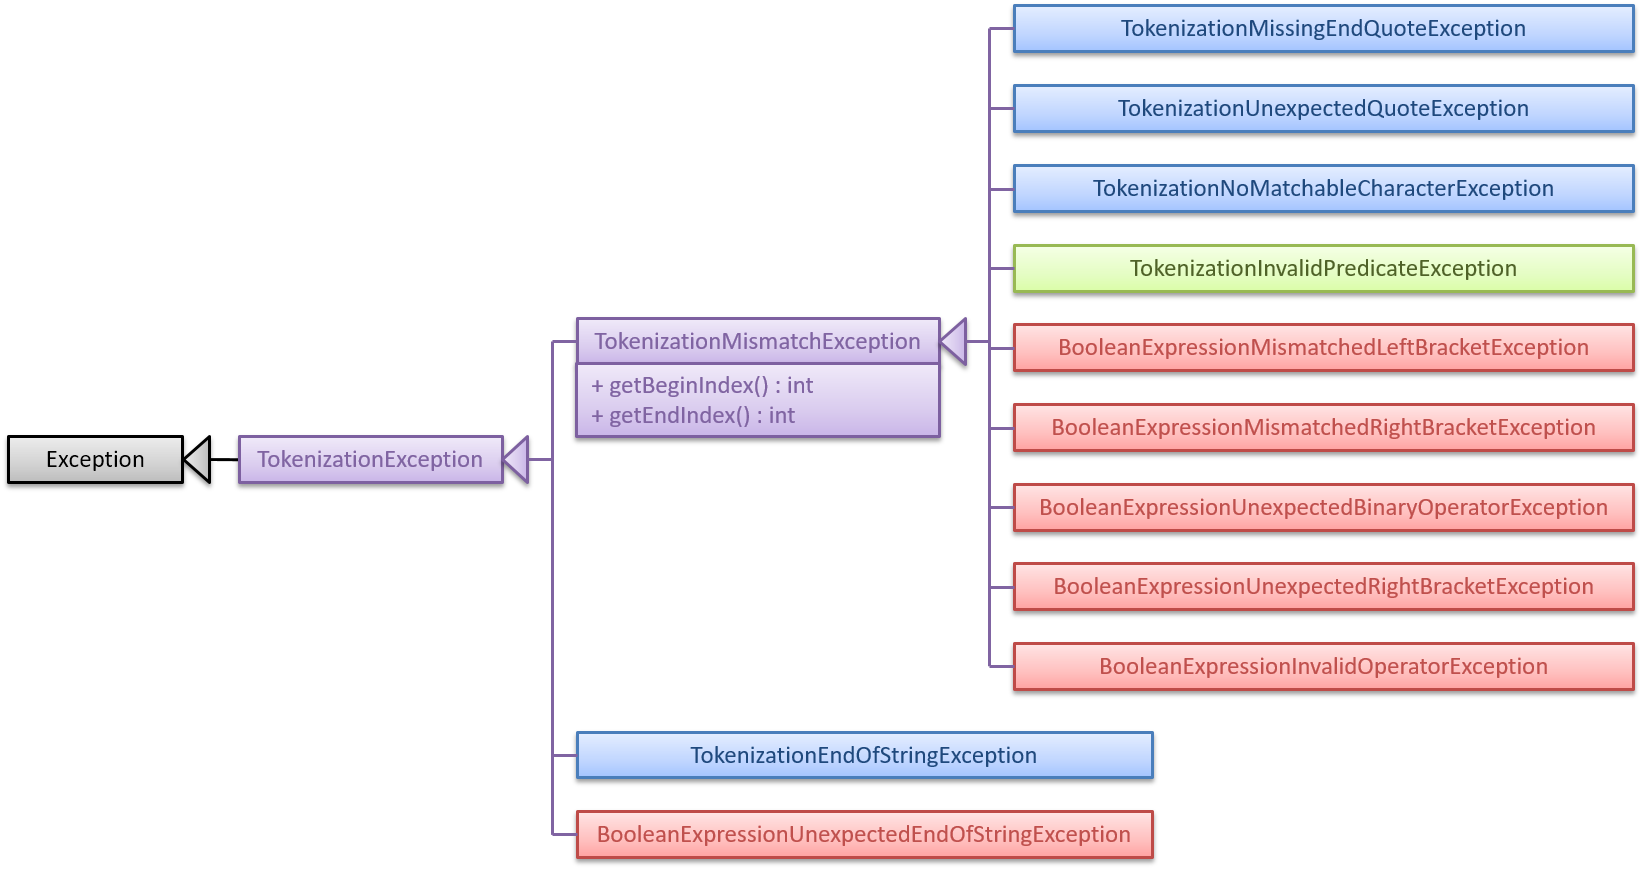
In the diagram above, the blue classes are exceptions thrown by StringTokenizer, while the red classes are exceptions thrown by BooleanExpressionParser. The green TokenizationInvalidPredicateException class is a wrapper class for exceptions thrown by the filter unit parser. In order to reduce coupling between StringTokenizer and BooleanExpressionParser, and to be able to distinguish (by type-based catch clauses) the end-of-string exceptions of those components, they do not share the same class for end-of-string exceptions.
TokenizationInvalidPredicateException is a wrapper class for InvalidPredicateException, which is thrown when the field-specific parser or set parser encounters an error. The diagram below shows the different exceptions that may be thrown to indicate the types of issues that may be encountered when parsing a filter unit, and how they may be propagated to FilterCommandParser via wrapping by TokenizationInvalidPredicateException:
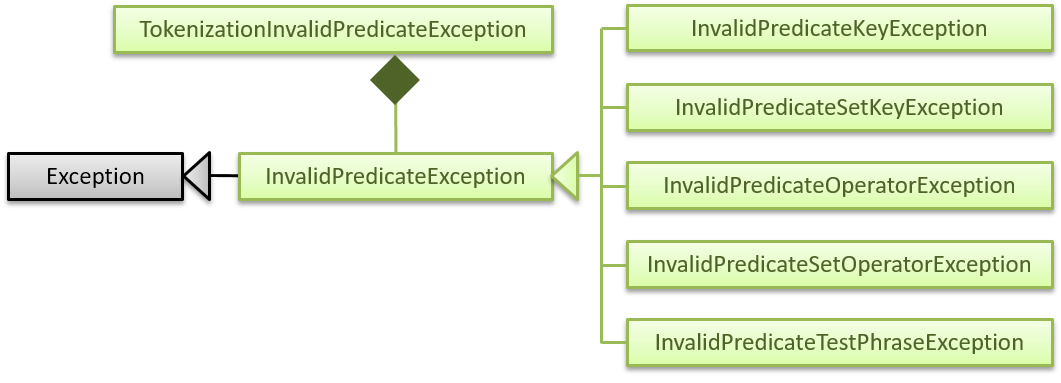
The filter unit parser is responsible for constructing a TokenizationInvalidPredicateException from any thrown InvalidPredicateException and associating the TokenizationInvalidPredicateException with the offending character range (which will be one of the three parts (or four, if using the extended set syntax) of the filter unit).
Each error message gets translated into a styled message string (encapsulated as ParseException) by FilterCommandParser, and that message string is propagated to the UI via the event system. The message string is styled such that the offending character range is coloured red and underlined in the ResultDisplay panel that is visible to the user.
| In total, there are around 15 distinct kinds of error conditions when parsing a filter expression, and each of these error conditions produce a customised message that is displayed to the user. |
4.6.8. Design considerations
4.6.8.1. Aspect: How to parse composite filter expressions
-
Alternative 1 (current choice): Use an algorithm that can parse arbitrarily complex expressions (i.e. the shunting yard algorithm).
-
Pros: Provides full flexibility in specifying composite filters.
-
Cons: Difficult to implement.
-
-
Alternative 2: Use a more restrictive parsing algorithm that prohibits parentheses and does not take operator precedence into consideration.
-
Pros: Easy to implement.
-
Cons: Filter command will be limited in expressiveness. As the order of operations do not follow usual programming languages or mathematical expressions, users need to spend more time to understand the parsing format before use, and they might use the command erroneously.
-
4.6.8.2. Aspect: Whether to support simplified filter semantics
-
Alternative 1 (current choice): Support simplified filter semantics (implicitly inserting
&between adjacent predicates, and the simplified filter unit syntax).-
Pros: Reduces cognitive overhead and typing time for most common cases, and makes
filterfeel like a standard keyword search function. -
Cons: It is not possible to detect when user accidentally omits the boolean operator or filter field, so the displayed tasks may not be what the user intended to view.
-
-
Alternative 2: Only support the unsimplified semantics.
-
Pros: Easier to implement because there are less cases to consider. Also, we can display an error if the user accidentally omits a boolean operator or field identifier.
-
Cons: More verbose filter expressions which may require higher cognitive overhead.
-
4.6.8.3. Aspect: What the convenience operator should do
-
Alternative 1 (current choice): Support a convenience operator that is an alias of the most common filter operator for each field.
-
Pros: Reduces cognitive overhead as the convenience operator is usually the expected behaviour for most applications.
-
Cons: Users might be surprised that the convenience operator is an alias for a different operator depending on the field identifier.
-
-
Alternative 2: Support a convenience operator that is an alias of a fixed operator regardless of field.
-
Pros: Easier for users to remember what the convenience operator does.
-
Cons: Convenience operator is not really convenient — the behaviour might be surprising or awkward for some fields.
-
-
Alternative 3: Don’t support the convenience operator at all.
-
Pros: Least amount of implementation work.
-
Cons: Additional cognitive overhead as users need to figure out which of the available operators they actually want.
-
4.6.8.4. Aspect: How to signal exceptional conditions when parsing filter expressions
-
Alternative 1 (current choice): Use a different type of checked exception for every possible type of failure condition.
-
Pros: Every possible failure condition is listed in the
throwsclause of all methods — developers can easily tell how exactly each aspect of parsing could fail, and Java will statically check that every possible failure condition is handled (which makes it impossible to overlook any failure conditions). -
Cons: More verbose method signatures.
-
-
Alternative 2: Use a single checked exception for all possible failure conditions, and distinguish errors by the message string instead.
-
Pros: Less verbose method signatures, and yet the benefit of checked exceptions is retained.
-
Cons: Developers can only tell what exact failure conditions are possible by inspecting the whole call graph of the method. Furthermore, it is difficult to distinguish different error conditions in order to customize and show relevant messages to the user.
-
-
Alternative 3: Use unchecked exceptions.
-
Pros: Simplest method signatures.
-
Cons: Easy to overlook possible failure conditions when modifying the code, so future developers might inadvertently introduce bugs.
-
4.7. Attachment feature
The attachment feature aims to help users organise and keep track of important files needed for the respective tasks. It allows users to associate files in their computer with a particular task. When the user subsequently decides to perform a particular task, this feature provides functionality to identify files previously associated with the task and facilitates exporting it to an appropriate location.
4.7.1. Current implementation
The attachment feature is mainly implemented by AttachmentCommand. As AttachmentCommand is an all-purpose command involving numerous actions, an interface AttachmentAction is defined within AttachmentCommand in order to facilitate this. There are 4 classes that implements AttachmentAction in order to implement the various actions of the attachment feature. The command line arguments for the attachment command is parsed by AttachmentCommandParser.
4.7.2. Sequence flow
Given below is a sequence of steps, illustrating the interaction between AttachmentCommandParser, AttachmentCommand and classes that implement AttachmentAction after a user enters a relevant command.
Step 1. The user enters an attachment command which involves either add, list, delete or get actions.
Step 2. The AttachmentCommandParser receives the command with the arguments given as a string.
Step 3. The AttachmentCommandParser interprets the arguments and constructs either a AddAttachmentAction for add, ListAttachmentAction for list, DeleteAttachmentAction for delete or GetAttachmentAction for get. The relevant arguments will also be passed as parameters to the constructors of these classes. Do note that these classes all extends from the abstract class AttachmentAction.
Step 4. An AttachmentCommand is constructed and initialized with the AttachmentAction constructed in Step 3.
Given below is another sequence of steps, also illustrated by the sequence diagram. They describe the interaction between AttachmentCommand and classes that implement AttachmentAction after the AttachmentCommand#execute method is invoked by the LogicManager.
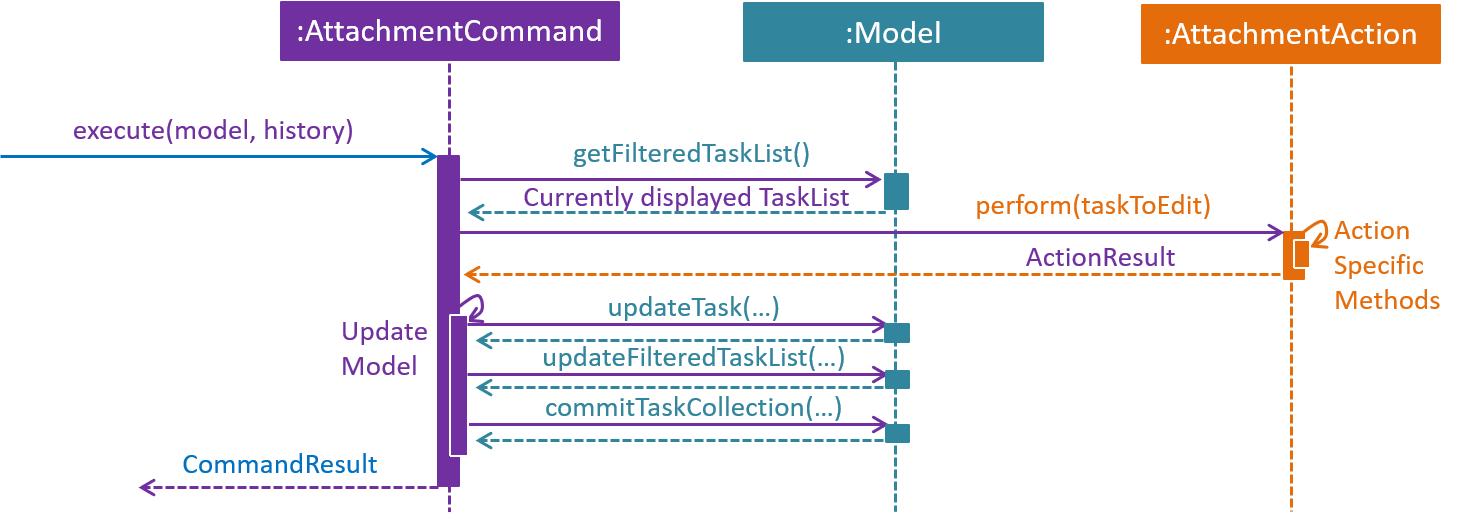
execute method of an AttachmentCommand.Step 1. The task identified by the user is retrieved from the Model.
Step 2. The perform method of the AttachmentAction is invoked, with the task retrieved in Step 1 as the parameter.
Step 3. The invoked AttachmentAction performs specific application logic which is different for each action. Then, a ActionResult object containing a Task and a message is returned to the execute method.
Step 4. The Model is updated with the Task object retrieved from the returned ActionResult.
Step 5. The message to be shown to the user is retrieved from the returned ActionResult. Then, it is used to create a CommandResult object which is to be returned to the the LogicManager.
4.7.3. AttachmentAction and implementing classes
AttachmentAction is an interface nested within AttachmentCommand. It defines and requires implementing classes to implement a perform method. The implementation for AttachmentAction is shown below:
public interface AttachmentAction {

    ActionResult perform(Task taskToEdit) throws CommandException;

}-
The
performmethod is invoked byAttachmentCommandto perform the action on the task provided.ActionResultis immutable and contains two properties: aTaskand amessagewhich can be used by implementing classes to return the updatedTasktogether with anymessagethat should be displayed to the user. SinceTaskis immutable, a new task with the modified values should be returned by the method, instead of modifyingtaskToEdit.
The contents of ActionResult is shown below:
private static class ActionResult {
    public final String resultMessage;
    public final Task updatedTask;

    public ActionResult(Task updatedTask, String resultMessage) {
        this.updatedTask = updatedTask;
        this.resultMessage = resultMessage;
    }

    // Returns the task
    public Task getTask() { return updatedTask; }

    // Returns the result message
    public String getMessage() { return resultMessage; }
}
4.7.3.1. AddAttachmentAction
AddAttachmentAction implements AttachmentAction and provides the implementations required for the user to associate a file with a task. In other words, it adds an attachment to a task. The constructor class takes in a single parameter, filePath, denoting the path to the file to be associated with the task. The perform method of AddAttachmentAction executes the following:
-
Checks if a file exists at the specified
filePath. ACommandExceptionwill be raised if this is not the case. -
Checks if the task already contains an attachment with the same filename. A
CommandExceptionwill be raised if this is not the case. -
Constructs a new
Attachmentobject using the file at the specifiedfilePath. -
Constructs a new
Taskobject with the same attributes as the original task, but with the additionalAttachmentobject added to the set of attachments.
4.7.3.2. ListAttachmentAction
ListAttachmentAction implements AttachmentAction and provides the implementations required for the user to list all the files associated with a task. In other words, it provides a listing of all attachments that are added to the task. The constructor class requries no parameters. The perform method of ListAttachmentAction executes the following:
-
Prints the total number of attachments in the specified task.
-
Prints the filename of each of the attachments in the specified task, with one attachment per line.
4.7.3.3. DeleteAttachmentAction
DeleteAttachmentAction implements AttachmentAction and provides the implementations required for the user to remove the association of a file that was previously associated with the task. In other words, it removes an attachment from a task. The constructor class takes in a single parameter, fileName, denoting the name of the attachment that is to be unassociated with the task. The perform method of DeleteAttachmentAction executes the following:
-
Checks if
fileNamecorresponds to a valid attachment in the specified task. ACommandExceptionwill be raised if this is not the case. ThefileNameis case sensitive. -
Constructs a new
Taskobject with the same attributes as the original task, but with theAttachmentobject identified by thefileNameremoved from the set of attachments.
4.7.3.4. GetAttachmentAction
GetAttachmentAction implements AttachmentAction and provides the implementations required for the user to retrieve a file that was previously associated with the task as attachment. In other words, it allows users to copy an attachment from a task out to the file system. The constructor class takes in two parameters, filename, denoting the name of the attachment and savePath, denoting the path to copy the attachment to. The perform method of GetAttachmentAction executes the following:
-
Checks if
fileNamecorresponds to a valid attachment in the specified task. ACommandExceptionwill be raised if this is not the case. ThefileNameargument is case sensitive. -
Checks if the attachment identified by
fileNamestill exists on the user’s filesystem and can be copied from. ACommandExceptionwill be raised if this is not the case. -
Copies the identified attachment to the path denoted by
savePathon the filesystem. ACommandExceptionwill be raised if there are errors in doing so.
4.7.4. Design considerations
4.7.4.1. Aspect: How to associate files to tasks
-
Alternative 1 (current choice): Saves the path of the file.
-
Pros: Easy to implement. Reduces storage footprint.
-
Cons: Associated file can cease to exist, due to it being renamed, moved or deleted.
-
-
Alternative 2: Copies the entire file to a user specified directory.
-
Pros: Deletion of the associated file (in its original location) will not affect the application.
-
Cons: Harder to implement file management system on the file system. Uses more storage space. User will not be able to update the attachment without deleting and re-adding the file.
-
4.7.4.2. Aspect: How to identify attachments within a task
-
Alternative 1 (current choice): Use the file name as an identifier.
-
Pros: More user friendly as there is less words to type.
-
Cons: Cannot have more than one attachment with the same file name in the same task. For example:
folder1/Template.docxandfolder2/Template.docxcannot be simultaneously added as attachments to the same task.
-
-
Alternative 2: Use the path to the file as an identifier.
-
Pros: Allows for more than one attachments with the same file name to be associated with the same task. For example:
folder1/Template.docxandfolder2/Template.docxcan be added to the same task as attachments. -
Cons: Cumbersome for the user to type the full path to identify the file.
-
-
Alternative 3: Prompt the user for an identifier for each attachment added.
-
Pros: Can be customized by the user to manage multiple files with the same file name in the same task.
-
Cons: Cumbersome for the user to type the identifier for every time they want to add attachments to a task.
-
4.8. Logging
The Deadline Manager uses java.util.logging for logging. The LogsCenter class is used to manage the logging levels and logging destinations.
-
The logging level can be controlled using the
logLevelsetting in the configuration file (See Section 4.9, “Configuration”) -
The
Loggerfor a class can be obtained usingLogsCenter.getLogger(Class)which will log messages according to the specified logging level -
Currently log messages are output through:
Consoleand to a.logfile.
Logging Levels
-
SEVERE: Critical problem detected which may possibly cause the termination of the application -
WARNING: Can continue, but with caution -
INFO: Information showing the noteworthy actions by the App -
FINE: Details that is not usually noteworthy but may be useful in debugging e.g. print the actual list instead of just its size
4.9. Configuration
Certain properties of the application can be controlled (e.g App name, logging level) through the configuration file (default: config.json).
5. Documentation
Asciidoc is used to write documentation. It is imperative that the documentation is updated as new features are implemented so that developers are aware of the changes made.
| We chose asciidoc over Markdown because asciidoc, although a bit more complex than Markdown, provides more flexibility in formatting. |
5.1. Editing documentation
See UsingGradle.adoc to learn how to render .adoc files locally to preview the end result of your edits.
Alternatively, you can download the AsciiDoc plugin for IntelliJ, which allows you to preview the changes you have made to your .adoc files in real-time.
5.2. Publishing documentation
See UsingTravis.adoc to learn how to deploy GitHub Pages using Travis.
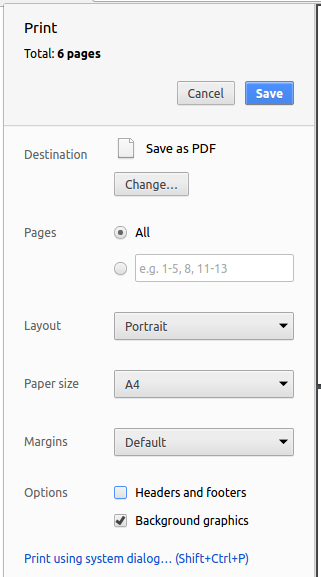
5.3. Converting documentation to PDF format
We use Google Chrome for converting documentation to PDF format, as Chrome’s PDF engine preserves hyperlinks used in webpages.
Here are the steps to convert the project documentation files to PDF format.
-
Follow the instructions in UsingGradle.adoc to convert the AsciiDoc files in the
docs/directory to HTML format. -
Go to your generated HTML files in the
build/docsfolder, right click on them and selectOpen with→Google Chrome. -
Within Chrome, click on the
Printoption in Chrome’s menu. -
Set the destination to
Save as PDF, then clickSaveto save a copy of the file in PDF format. For best results, use the settings indicated in the screenshot below.
5.4. Site-wide documentation settings
The build.gradle file specifies some project-specific asciidoc attributes which affects how all documentation files within this project are rendered.
Attributes left unset in the build.gradle file will use their default value, if any.
|
| Attribute name | Description | Default value |
|---|---|---|
|
The name of the website. If set, the name will be displayed near the top of the page. |
not set |
|
URL to the site’s repository on GitHub. Setting this will add a "View on GitHub" link in the navigation bar. |
not set |
|
Define this attribute if the project is an official SE-EDU project. This will render the SE-EDU navigation bar at the top of the page, and add some SE-EDU-specific navigation items. |
not set |
5.5. Per-file documentation settings
Each .adoc file may also specify some file-specific asciidoc attributes which affects how the file is rendered.
Asciidoctor’s built-in attributes may be specified and used as well.
Attributes left unset in .adoc files will use their default value, if any.
|
| Attribute name | Description | Default value |
|---|---|---|
|
Site section that the document belongs to.
This will cause the associated item in the navigation bar to be highlighted.
One of: * Official SE-EDU projects only |
not set |
|
Set this attribute to remove the site navigation bar. |
not set |
5.6. Site template
The files in docs/stylesheets are the CSS stylesheets of the site.
You can modify them to change some properties of the site’s design.
The files in docs/templates controls the rendering of .adoc files into HTML5.
These template files are written in a mixture of Ruby and Slim.
|
Modifying the template files in |
6. Testing
Testing is important to the development of this project as it gives the developers and users assurance that the App will function as intended.
6.1. Running tests
There are three ways to run tests.
| The most reliable way to run tests is the 3rd one. The first two methods might fail some GUI tests due to platform/resolution-specific idiosyncrasies. |
Method 1: Using IntelliJ JUnit test runner
-
To run all tests, right-click on the
src/test/javafolder and chooseRun 'All Tests' -
To run a subset of tests, you can right-click on a test package, test class, or a test and choose
Run 'ABC'
Method 2: Using Gradle
-
Open a console and run the command
gradlew clean allTests(Mac/Linux:./gradlew clean allTests)
| See UsingGradle.adoc for more info on how to run tests using Gradle. |
Method 3: Using Gradle (headless)
Thanks to the TestFX library we use, our GUI tests can be run in the headless mode. In the headless mode, GUI tests do not show up on the screen. That means the developer can do other things on the Computer while the tests are running.
To run tests in headless mode, open a console and run the command gradlew clean headless allTests (Mac/Linux: ./gradlew clean headless allTests)
6.2. Types of tests
We have two types of tests:
-
GUI Tests - These are tests involving the GUI. They include
-
System Tests that test the entire App by simulating user actions on the GUI. These are in the
systemtestspackage. -
Unit tests that test the individual components. These are in
seedu.address.uipackage.
-
-
Non-GUI Tests - These are tests not involving the GUI. They include
-
Unit tests targeting the lowest level methods/classes.
e.g.seedu.address.commons.StringUtilTest -
Integration tests that are checking the integration of multiple code units (those code units are assumed to be working).
e.g.seedu.address.storage.StorageManagerTest -
Hybrids of unit and integration tests. These test are checking multiple code units as well as how the are connected together.
e.g.seedu.address.logic.LogicManagerTest
-
6.3. Troubleshooting testing
Sometimes, you would encounter problems with testing, and certain tests may fail with unexpected exceptions. An example is illustrated below:
Problem: HelpWindowTest fails with a NullPointerException.
-
Reason: One of its dependencies,
HelpWindow.htmlinsrc/main/resources/docsis missing. -
Solution: Execute Gradle task
processResources.
7. Dev Ops
As we develop the app, some tasks are repeated very often. These tasks can be better done if we utilise Dev Ops, to automatically process these repetitive tasks.
7.1. Build automation
See UsingGradle.adoc to learn how to use Gradle for build automation.
7.2. Continuous integration
We use Travis CI and AppVeyor to perform Continuous Integration on our projects. See UsingTravis.adoc and UsingAppVeyor.adoc for more details.
7.3. Coverage reporting
We use Coveralls to track the code coverage of our projects. See UsingCoveralls.adoc for more details.
7.4. Documentation previews
When a pull request has changes to asciidoc files, you can use Netlify to see a preview of how the HTML version of those asciidoc files will look like when the pull request is merged. See UsingNetlify.adoc for more details.
7.5. Making a release
Here are the steps to create a new release.
-
Update the version number in
MainApp.java. -
Generate a JAR file using Gradle.
-
Tag the repo with the version number. e.g.
v0.1 -
Create a new release using GitHub and upload the JAR file you created.
7.6. Managing dependencies
A project often depends on third-party libraries. For example, deadline manager depends on the Jackson library for XML parsing. Managing these dependencies can be automated using Gradle. For example, Gradle can download the dependencies automatically, which is better than these alternatives.
a. Include those libraries in the repo (this bloats the repo size)
b. Require developers to download those libraries manually (this creates extra work for developers)
Appendix A: Suggested programming tasks to get started
Suggested path for new programmers:
-
First, add small local-impact (i.e. the impact of the change does not go beyond the component) enhancements to one component at a time. Some suggestions are given in Section A.1, “Improving each component”.
-
Next, add a feature that touches multiple components to learn how to implement an end-to-end feature across all components. Section A.2, “Creating a new command:
remark” explains how to go about adding such a feature.
A.1. Improving each component
Each individual exercise in this section is component-based (i.e. you would not need to modify the other components to get it to work).
Logic component
Scenario: You are in charge of logic. During dog-fooding, your team realize that it is troublesome for the user to type the whole command in order to execute a command. Your team devise some strategies to help cut down the amount of typing necessary, and one of the suggestions was to implement aliases for the command words. Your job is to implement such aliases.
Do take a look at Section 3.5, “Logic component” before attempting to modify the Logic component.
|
-
Add a shorthand equivalent alias for each of the individual commands. For example, besides typing
clear, the user can also typecto remove all tasks in the list.
Model component
Scenario: You are in charge of model. One day, the logic-in-charge approaches you for help. He wants to implement a command such that the user is able to remove a particular tag from everyone in the deadline manager, but the model API does not support such a functionality at the moment. Your job is to implement an API method, so that your teammate can use your API to implement his command.
Do take a look at Section 3.6, “Model component” before attempting to modify the Model component.
|
-
Add a
removeTag(Tag)method. The specified tag will be removed from everyone in the deadline manager.
Ui component
Scenario: You are in charge of ui. During a beta testing session, your team is observing how the users use your deadline manager application. You realize that one of the users occasionally tries to delete non-existent tags from a contact, because the tags all look the same visually, and the user got confused. Another user made a typing mistake in his command, but did not realize he had done so because the error message wasn’t prominent enough. A third user keeps scrolling down the list, because he keeps forgetting the index of the last task in the list. Your job is to implement improvements to the UI to solve all these problems.
Do take a look at Section 3.4, “UI component” before attempting to modify the UI component.
|
-
Use different colors for different tags inside task cards. For example,
friendstags can be all in brown, andcolleaguestags can be all in yellow.Before
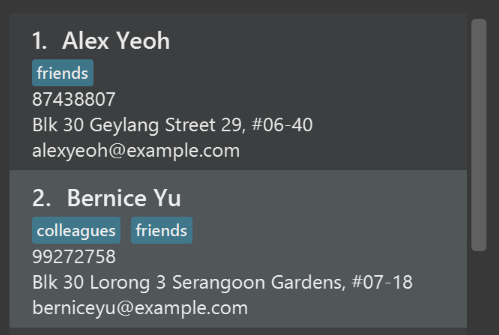
After
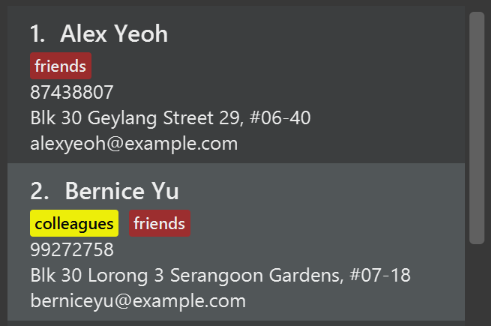
-
Modify
NewResultAvailableEventsuch thatResultDisplaycan show a different style on error (currently it shows the same regardless of errors).Before
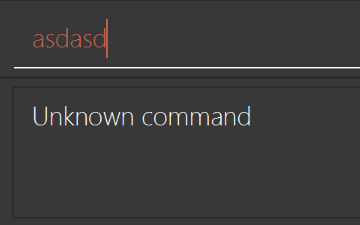
After

-
Modify the
StatusBarFooterto show the total number of people in the deadline manager.Before

After

Storage component
Scenario: You are in charge of storage. For your next project milestone, your team plans to implement a new feature of saving the deadline manager to the cloud. However, the current implementation of the application constantly saves the deadline manager after the execution of each command, which is not ideal if the user is working on limited internet connection. Your team decided that the application should instead save the changes to a temporary local backup file first, and only upload to the cloud after the user closes the application. Your job is to implement a backup API for the deadline manager storage.
Do take a look at Section 3.7, “Storage component” before attempting to modify the Storage component.
|
-
Add a new method
backupTaskCollection(ReadOnlyTaskCollection), so that the deadline manager can be saved in a fixed temporary location.
A.2. Creating a new command: remark
By creating this command, you will get a chance to learn how to implement a feature end-to-end, touching all major components of the app.
Scenario: You are a software maintainer for taskCollection, as the former developer team has moved on to new projects. The current users of your application have a list of new feature requests that they hope the software will eventually have. The most popular request is to allow adding additional comments/notes about a particular contact, by providing a flexible remark field for each contact, rather than relying on tags alone. After designing the specification for the remark command, you are convinced that this feature is worth implementing. Your job is to implement the remark command.
A.2.1. Description
Edits the remark for a task specified in the INDEX.
Format: remark INDEX r/[REMARK]
Examples:
-
remark 1 r/Likes to drink coffee.
Edits the remark for the first task toLikes to drink coffee. -
remark 1 r/
Removes the remark for the first task.
A.2.2. Step-by-step instructions
A.2.2.1. [Step 1] Logic: Teach the app to accept 'remark' which does nothing
Let’s start by teaching the application how to parse a remark command. We will add the logic of remark later.
Main:
-
Add a
RemarkCommandthat extendsCommand. Upon execution, it should just throw anException. -
Modify
TaskCollectionParserto accept aRemarkCommand.
Tests:
-
Add
RemarkCommandTestthat tests thatexecute()throws an Exception. -
Add new test method to
TaskCollectionParserTest, which tests that typing "remark" returns an instance ofRemarkCommand.
A.2.2.2. [Step 2] Logic: Teach the app to accept 'remark' arguments
Let’s teach the application to parse arguments that our remark command will accept. E.g. 1 r/Likes to drink coffee.
Main:
-
Modify
RemarkCommandto take in anIndexandStringand print those two parameters as the error message. -
Add
RemarkCommandParserthat knows how to parse two arguments, one index and one with prefix 'r/'. -
Modify
TaskCollectionParserto use the newly implementedRemarkCommandParser.
Tests:
-
Modify
RemarkCommandTestto test theRemarkCommand#equals()method. -
Add
RemarkCommandParserTestthat tests different boundary values forRemarkCommandParser. -
Modify
TaskCollectionParserTestto test that the correct command is generated according to the user input.
A.2.2.3. [Step 3] Ui: Add a placeholder for remark in TaskCard
Let’s add a placeholder on all our TaskCard s to display a remark for each task later.
Main:
-
Add a
Labelwith any random text insideTaskListCard.fxml. -
Add FXML annotation in
TaskCardto tie the variable to the actual label.
Tests:
-
Modify
TaskCardHandleso that future tests can read the contents of the remark label.
A.2.2.4. [Step 4] Model: Add Remark class
We have to properly encapsulate the remark in our Task class. Instead of just using a String, let’s follow the conventional class structure that the codebase already uses by adding a Remark class.
Main:
-
Add
Remarkto model component (you can copy fromAddress, remove the regex and change the names accordingly). -
Modify
RemarkCommandto now take in aRemarkinstead of aString.
Tests:
-
Add test for
Remark, to test theRemark#equals()method.
A.2.2.5. [Step 5] Model: Modify Task to support a Remark field
Now we have the Remark class, we need to actually use it inside Task.
Main:
-
Add
getRemark()inTask. -
You may assume that the user will not be able to use the
addandeditcommands to modify the remarks field (i.e. the task will be created without a remark). -
Modify
SampleDataUtilto add remarks for the sample data (delete yourtaskCollection.xmlso that the application will load the sample data when you launch it.)
A.2.2.6. [Step 6] Storage: Add Remark field to XmlAdaptedTask class
We now have Remark s for Task s, but they will be gone when we exit the application. Let’s modify XmlAdaptedTask to include a Remark field so that it will be saved.
Main:
-
Add a new Xml field for
Remark.
Tests:
-
Fix
invalidAndValidTaskTaskCollection.xml,typicalTaskCollection.xml,validTaskCollection.xmletc., such that the XML tests will not fail due to a missing<remark>element.
A.2.2.7. [Step 6b] Test: Add withRemark() for TaskBuilder
Since Task can now have a Remark, we should add a helper method to TaskBuilder, so that users are able to create remarks when building a Task.
Tests:
-
Add a new method
withRemark()forTaskBuilder. This method will create a newRemarkfor the task that it is currently building. -
Try and use the method on any sample
TaskinTypicalTasks.
A.2.2.8. [Step 7] Ui: Connect Remark field to TaskCard
Our remark label in TaskCard is still a placeholder. Let’s bring it to life by binding it with the actual remark field.
Main:
-
Modify
TaskCard's constructor to bind theRemarkfield to theTask's remark.
Tests:
-
Modify
GuiTestAssert#assertCardDisplaysTask(…)so that it will compare the now-functioning remark label.
A.2.2.9. [Step 8] Logic: Implement RemarkCommand#execute() logic
We now have everything set up… but we still can’t modify the remarks. Let’s finish it up by adding in actual logic for our remark command.
Main:
-
Replace the logic in
RemarkCommand#execute()(that currently just throws anException), with the actual logic to modify the remarks of a task.
Tests:
-
Update
RemarkCommandTestto test that theexecute()logic works.
A.2.3. Full solution
See this PR for the step-by-step solution.
Appendix B: Product scope
Target user profile:
-
has a need to manage a significant number of contacts
-
prefer desktop apps over other types
-
can type fast
-
prefers typing over mouse input
-
is reasonably comfortable using CLI apps
Value proposition: manage contacts faster than a typical mouse/GUI driven app
Appendix C: User stories
Priorities: High (must have) - * * *, Medium (nice to have) - * *, Low (unlikely to have) - *
| Priority | As a … | I want to … | So that I can… |
|---|---|---|---|
|
new user |
see usage instructions |
refer to instructions when I forget how to use the App |
|
user |
add a new task |
|
|
user |
delete a task |
remove entries that I no longer need |
|
user |
find a task by name |
locate details of tasks without having to go through the entire list |
|
user with many tasks in the deadline manager |
sort tasks by name |
locate a task easily |
{More to be added}
Appendix D: Use cases
(For all use cases below, the System is the DeadlineManager and the Actor is the user, unless specified otherwise)
Use case: Delete task
MSS
-
User requests to list tasks
-
TaskCollection shows a list of tasks
-
User requests to delete a specific task in the list
-
DeadlineManager deletes the task
Use case ends.
Extensions
-
2a. The list is empty.
Use case ends.
-
3a. The given index is invalid.
-
3a1. Deadline Manager shows an error message.
Use case resumes at step 2.
-
Use case: Add attachment to task
MSS
-
User requests to list tasks
-
User requests to add a file as attachment to the specific task in the list
-
Deadline Manager adds the file as attachment to the task
Use case ends.
Extensions
-
1a. User is presented with too many tasks.
-
1a1. User requests Deadline Manager to only show a subset of tasks or to sort them in some specified order
-
1a2. Deadline Manager shows the requested subset of all the tasks
Use case resumes at step 2.
-
-
2a. The file to be added does not exist on the user’s file system.
-
2a1. Deadline Manager shows an error message.
Use case resumes at step 2.
-
-
2b. There is already an existing file attached to the task, with the same file name.
-
2a2. Deadline Manager shows an error message.
Use case resumes at step 2.
-
Appendix E: Non-functional requirements
-
The application should work on any mainstream OS as long as it has Java
9or higher installed. -
The application should be able to hold up to 1000 tasks without a noticeable sluggishness in performance for typical usage.
-
For a user with above average typing speed for regular English text (i.e. not code, not system admin commands), he/she should be able to accomplish most of the tasks faster using commands than using the mouse.
-
The information about tasks should be stored in the local filesystem and are able to be persisted across different runs of the application.
Appendix G: Product survey
Product Name
Author: …
Pros:
-
…
-
…
Cons:
-
…
-
…
Appendix H: Instructions for manual testing
Given below are instructions to test the app manually.
| These instructions only provide a starting point for testers to work on; testers are expected to do more exploratory testing. |
H.1. Launch and shutdown
-
Initial launch
-
Download the jar file and copy into an empty folder
-
Double-click the jar file
Expected: Shows the GUI with a set of sample contacts. The window size may not be optimum.
-
-
Saving window preferences
-
Resize the window to an optimum size. Move the window to a different location. Close the window.
-
Re-launch the app by double-clicking the jar file.
Expected: The most recent window size and location is retained.
-
H.2. Adding a task
-
Add a new task
-
Run the
add n/New Program d/01/02/2018command.
Expected: A new task is added to Deadline Manager with name: New Program, deadline: 01/02/2018, priority: 0, frequency: 0, no tags and no attachments. -
Run the
add n/New Program d/01/02/2018command again.
Expected: Another new task is added to Deadline Manager with the same parameters as (a) above. -
Run the
add n/A Recurring Task d/01/01/2018 f/7 p/1 t/importantcommand.
Expected: A new task is added to Deadline Manager with name: A Recurring Task, deadline: 01/01/2018, priority: 1, frequency: 7, tags: important.
-
H.3. Deleting a task
-
Deleting a task while all tasks are listed
-
List all tasks using the
listcommand. -
Ensure that there is at least 1 task, otherwise follow adding a task to add a task first.
-
Run the
delete 1command
Expected: First task is deleted from Deadline Manager. Details of the deleted task shown in the status message. Timestamp in the status bar is updated. -
Test case:
delete 0
Expected: No task is deleted. Error details shown in the status message. Status bar remains the same.
-
H.4. Filtering the list of tasks
| All unspecified fields of a task should be set to some value that does not match the filter predicate being tested. |
-
Filtering using the simplified filter syntax
-
Prerequisites: Task list contains a task with name
Presentationand another task with tagpresent. -
Test case:
filter present
Expected: Both tasks are displayed. -
Test case:
filter presentation
Expected: Only the task with namePresentationis displayed. -
Test case:
filter presentations
Expected: None of the two tasks are displayed.
-
-
Filtering with field identifier
-
Prerequisites: Task list contains a task with name
Presentationand another task with tagpresent. -
Test case:
filter n:present
Expected: Only the task with namePresentationis displayed. -
Test case:
filter t:present
Expected: Only the task with tagpresentis displayed.
-
-
Filtering by deadline
-
Prerequisites: Task list contains a task with deadline
1/12/2018and another task with deadline15/12/2018. -
Test case:
filter 15/12/2018
Expected: Both tasks are displayed. -
Test case:
filter d:15/12/2018
Expected: Both tasks are displayed. -
Test case:
filter 10/12/2018
Expected: Only the task with deadline1/12/2018is displayed. -
Test case:
filter d=15/12/2018
Expected: Only the task with deadline15/12/2018is displayed. -
Test case:
filter d>15/12/2018
Expected: Only the task with deadline15/12/2018is displayed. -
Test case:
filter 15/12
Expected: Both tasks are displayed. -
Test case:
filter d=15/12
Expected: Only the task with deadline15/12/2018is displayed.
-
-
Filtering by tag
-
Prerequisites: Task list contains a task with tags
homeworkandCS2103, and another task with tagshomework. -
Test case:
filter home
Expected: Both tasks are displayed. -
Test case:
filter t:home
Expected: Both tasks are displayed. -
Test case:
filter t:home,cs
Expected: Only the first task is displayed. -
Test case:
filter t=home
Expected: None of the tasks are displayed. -
Test case:
filter t=homework
Expected: Both tasks are displayed.
-
-
Filtering using set-based filter operators
-
Prerequisites: Task list contains a task with tags
homeworkandCS2103, and another task with tagshomework. -
Test case:
filter t:=homework
Expected: Both tasks are displayed. -
Test case:
filter t==homework
Expected: Only the second task is displayed. -
Test case:
filter t>=homework
Expected: Both tasks are displayed. -
Test case:
filter t>=homework,cs2103
Expected: Only the first task is displayed. -
Test case:
filter t⇐homework,cs2103
Expected: Both tasks are displayed.
-
-
Filtering with composite filters
-
Prerequisites: Task list contains a task with name
CS2103 Presentationand another task with nameMA1101R Homework. -
Test case:
filter present home
Expected: None of the two tasks are displayed. -
Test case:
filter present & home
Expected: None of the two tasks are displayed. -
Test case:
filter present && home
Expected: None of the two tasks are displayed. -
Test case:
filter present | home
Expected: Both tasks are displayed. -
Test case:
filter present || home
Expected: Both tasks are displayed. -
Test case:
filter present | !home
Expected: Only the task with nameCS2103 Presentationis displayed. -
Test case:
filter !present | home
Expected: Only the task with nameMA1101R Homeworkis displayed. -
Test case:
filter (present | home) & !MA1101
Expected: Only the task with nameCS2103 Presentationis displayed. -
Test case:
filter (present | home) & ! MA1101
Expected: Only the task with nameCS2103 Presentationis displayed. -
Test case:
filter (present|home)&!MA1101
Expected: Only the task with nameCS2103 Presentationis displayed. -
Test case:
filter (present|home)!MA1101
Expected: Only the task with nameCS2103 Presentationis displayed.
-
-
Comprehensive error messages
-
Prerequisites: None.
-
Each of these test cases should produce a distinct error message and the error is indicated in the user interface. (While the error message may not be what you expect (e.g. the first test case highlights the
)character instead of the preceding&, and which character should be highlighted depends on your point of view), the error message should be nonetheless reasonable.)-
filter cs&(("presentation slide"&f=7&)|meeting)&!csp -
filter cs&(("presentation slide"&f=7)|meeting)&! -
filter cs&(("presentation slide"&f=7)|meeting)&!csp) -
filter cs&((("presentation slide"&f=7)|meeting)&!csp -
filter cs&(("presentation slide"&f=7)|meeting)$!csp -
filter cs&(("presentation slide&f=7)|meeting)&!csp -
filter cs&((presentation slide"&f=7)|meeting)&!csp -
filter cs&(("presentation slide"&f=xxx)|meeting)&!csp -
filter cs&(("presentation slide"&g=7)|meeting)&!csp
-
-
H.5. Attachments
-
Adding an attachment to a task
-
Prerequisites:
-
List all tasks using the
listcommand. There should be at least one task in the Deadline Manager. -
Create a file named
hello.txtin the same directory as the Deadline Manager’s jar file. You must have read permission for that file. -
The first task listed in the application does not have any attachments yet.
-
Ensure that there isn’t a file named
nothere.txtin the same directory as the Deadline Manager’s jar file.
-
-
Test case:
attachment 1 add p/"hello.txt"
Expected:hello.txtis added to the first task as attachment. A gray label containinghello.txtshould appear in the Task card of the first task. All tasks should be listed. -
Test case:
attachment 1 add p/"nothere.txt"
Expected:nothere.txtis not added as attachment as the file does not exist. Error details is shown in the status message.
-
-
Deleting an attachment from a task
-
Prerequisites:
-
List all tasks using the
listcommand. There should be at least one task in the Deadline Manager. -
An attachment named
hello.txtin the same directory as the Deadline Manager’s jar file is already added to the first task listed in the application. (To do so, you may refer to the previous section.) -
The first task listed has only 1 single attachment:
hello.txt.
-
-
Test case:
attachment 1 delete n/"hello.txt"
Expected:hello.txtis unassociated with the first task. It should still remain in the filesystem. The gray label containinghello.txtin the Task card of the first task is removed. All tasks should now be listed. -
Test case:
attachment 1 delete n/"nothere.txt"
Expected: No attachment is unassociated from the first task. Error details is shown in the status message.
-
-
Listing attachments of a task
-
Prerequisites:
-
List all tasks using the
listcommand. There should be at least two tasks in the Deadline Manager. -
The first task listed should already have some number of attachments.
-
The second task listed should have no attachments.
-
-
Test case:
attachment 1 list
Expected: The status message is updated with a listing of all the attachments of the first task. The attachments are identified by their filename, not filepath. -
Test case:
attachment 2 list
Expected: The list command should still be successful but it should just indicate0 attachment(s) in total.
-
-
Retrieving attachments from a task
-
Prerequisites:
-
List all tasks using the
listcommand. There should be at least 1 task in Deadline Manager. -
Create a file named
hello.txtin the same directory as the Deadline Manager’s jar file. You must have read permission for that file. -
Add
hello.txtas an attachment to the first task. (You may refer to the previous sections on how to do so.) -
Ensure that you have write permissions to the file/location
hello2.txtin the same directory as the Deadline Manager’s jar file.
-
-
Test case:
attachment 1 get n/"hello.txt" p/"hello2.txt"
Expected: The file contents ofhello.txtis copied tohello2.txtin the same directory as the Deadline Manager’s jar file. Ifhello2.txtis previously another file, it would have been overwritten by the command. -
Test case:
attachment 1 get n/"nothere.txt" p/"hello2.txt"
Expected: Error details saying thatnothere.txtis not an attachment would be displayed as the status message. No file is copied.
-
H.6. Completing a task
-
Add a new task . Complete a non-recurring task
-
Run the
add n/New Program d/01/02/2018command. + .. Run theclearcommand, followed byadd n/Simple Task d/01/01/2018command.
Expected: A new task is added to Deadline Manager with name: New Program, deadline: 01/02/2018, priority: 0, frequency: 0, no tags and no attachments. Expected: The task list is cleared and a new task is added to Deadline Manager with name: Simple Task, deadline: 01/01/2018, priority: 0, frequency: 0, no tags and no attachments. -
Run the add n/New Program d/01/02/2018` command again. + .. Run the
complete 1command.
Expected: Another new task is added to Deadline Manager with the same parameters as (a) above. Expected: The task created above is deleted.
-
-
Complete a recurring task
-
Run the
clearcommand, followed byadd n/Weekly Task d/01/01/2018 f/7command.
Expected: The task list is cleared and a new task is added to Deadline Manager with name: Weekly Task, deadline: 01/01/2018, priority: 0, frequency: 7, no tags and no attachments. -
Run the
complete 1command.
Expected: The deadline of the task created above is modified to 08/01/2018.
-
H.7. Adding a task
-
Add a new task
-
Run the
add n/New Program d/01/02/2018command.
Expected: A new task is added to Deadline Manager with name: New Program, deadline: 01/02/2018, priority: 0, frequency: 0, no tags and no attachments. -
Run the add n/New Program d/01/02/2018` command again.
Expected: Another new task is added to Deadline Manager with the same parameters as (a) above.
-
H.8. Exporting tasks
-
Export in XML format
-
List all tasks using the
listcommand. -
Ensure that there is at least 1 task, otherwise follow Section H.2, “Adding a task” to add a task first.
-
Ensure that you can write to the directory that Deadline Manager is running from, and that you don’t already have a file named
tasks.xml, then run theexport p/"tasks.xml"command.
Expected: A new file, tasks.xml, is created in the same directory from where Deadline Manager is run. A success message is displayed, indicating that export completed successfully. -
Run the
export p/"tasks.xml"command again.
Expected: An error message is displayed indicating that export failed. This is because tasks.xml already exists, and Deadline Manager will refuse to export in order to protect your data. -
Run the
export p/"tasks.xml" r/overwritecommand.
Expected: Expected: A new file, tasks.xml, is created in the same directory from where Deadline Manager is run, and overwrites the existing file. A success message is displayed, indicating that export completed successfully.
-
-
Export in CSV format
-
List all tasks using the
listcommand. -
Ensure that there is at least 1 task, otherwise follow adding a task to add a task first.
-
Ensure that you can write to the directory that Deadline Manager is running from, and that you don’t already have a file named
tasks.csv, then run theexport csv p/"tasks.csv"command.
Expected: A new file, tasks.csv, is created in the same directory from where Deadline Manager is run. A success message is displayed, indicating that export completed successfully.
-
H.9. Importing tasks
-
Import tasks in XML format
-
Follow exporting tasks first to ensure that you have already exported a set of tasks into a readable
tasks.xmlfile in the same directory that Deadline Manager is running from. -
Run the
clearcommand to remove all existing tasks. -
Run the
import p/"tasks.xml"command to import tasks fromtasks.xmlinto Deadline Manager.
Expected: Deadline Manager is re-populated with all the tasks in tasks.xml. Additionally, a success message is displayed, indicating that import completed successfully. -
Run the
import p/"tasks.xml"command again.
Expected: A success message is displayed, indicating that import completed successfully. However, no new tasks are imported, because by default, Deadline Manager skips tasks that already exist in Deadline Manager. -
Run the
import p/"tasks.xml" r/allcommand.
Expected: A success message is displayed, indicating that import completed successfully. All the tasks fromtasks.xmlare imported again, creating duplicate entries. -
Run the
import p/"non_existent_file.xml"command, wherenon_existent_file.xmlrefers to any file that does not exist.
Expected: An error message is displayed, indicating that Deadline Manager is unable to import the xml file specified.
-
H.10. Sorting a list of tasks
-
Sorting a list of tasks
-
Prerequisites: List all tasks using the
listcommand. Multiple tasks in the list. -
Test case:
sort n<
Expected: Sorts the list of tasks according to names in alphabetical ascending order. -
Test case:
sort p< name>
Expected: Sorts the list of tasks first according to ascending order of priority and then in case some tasks have the same priority. Ties are broken in descending order of names (alphabetical order). -
Test case:
sort name=
Expected: The view of the tasks does not change. Error details shown in the status message. Status bar remains the same. -
Other incorrect sort commands to try:
sort,sort name=,sort tag<cs2101
Expected: Similar to previous.
-